


Appendix
Adjusting the Printhead
Only adjust the printhead position if you have done the following and are still
experiencing unsatisfactory print quality (the procedures for these adjustments are
located in Chapter 3.):
1. Check the initial print quality.
2. Adjust the print darkness.
3. Adjust the toggle pressure.
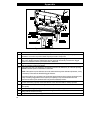
Printhead Position Adjustment Procedure
Refer to Figure 36 throughout this procedure.
You will need a #2 Phillips screwdriver, a 2.5 mm Hex (Allen Key) Driver, and a flathead screw-
driver.
1.
To begin this procedure, printing on the test labels must initially be a light gray darkness.
First, press the MODE key (DARKEN light and PAUSE light turn ON) to permit darkness
adjustment.
2. Press the PAUSE key to begin printing test labels.
3. While observing the print darkness, repeatedly press the DOWN (CANCEL) key to make the
printing LIGHTER, until a light gray darkness is achieved.
NOTE: If the light gray print darkness is not achieved, it may be necessary to increase or decrease
the Printhead Toggle Pressure.
4. Once proper print darkness is achieved, press the PAUSE key to stop printing.
5. If the Cutter Module is used, remove it according to the instructions in this chapter.
Remove the two Phillips head mounting screws that fasten the Tear-Off Plate, then remove
the Tear-Off Plate by pressing it IN then UP to disengage the mounting bracket.
6. Use a 2.5 mm Hex (Allen Key) Driver to remove the Printhead Support Bracket and the two
mounting screws.
7. Use a #2 Phillips screwdriver to loosen (do not remove) the two screws holding the Strip
Plate in position.
8. Also use the #2 Phillips screwdriver to loosen (do not remove) the two (2) Printhead Position
Locking Screws two (2) full turns. Then re-tighten finger-tight to remove looseness.
9. Use the Head Open Lever to push the Printhead and its Mounting Bracket all the way forward.
10. Prepare to adjust the printhead position by placing a flathead screwdriver in one of the
Printhead Adjustment Slots.
11. Press the PAUSE key to start printing test labels.
12. While applying forward pressure against the printhead with the Head Open Lever, adjust the
Position Adjustment Slots, first one, then the other, until the darkest printing is observed on
the test labels.
13. Insure that the lines printed on the test labels are parallel to the top of the label by making
minor adjustments to the left or right Slot/Screw.
14. While still holding the Head Open Lever against the Printhead Bracket, tighten the two (2)
Printhead Position Locking Screws.
Appendix
63