


II. Disassemble the Cutter Module.
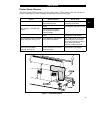
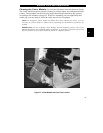
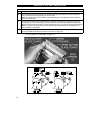
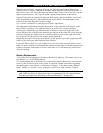
1. See Figure 20. Hold the Cutter Module as illustrated. Put your thumbs on the two Wire Spring
Loops and your index fingers on the top of the Rear Cutter Blade Guard. It may help to lay the
Cutter Module on a table or other surface throughout this process.
2. To remove the Rear Cutter Blade Guard, first press down simultaneously on the two Wire
Spring Loops. While pressing down on the loops, press the Rear Cutter Guard back toward
you and over top of the Loops. (You’re trying to tuck the Loops underneath the Blade Guard in
this process.)
3. Continue pressing the Rear Cutter Guard toward you and allow the back edge of the Guard to
pop up as the Guard comes free from its holders. You may now remove the Rear Cutter Guard
by lifting it off of the module.
NOTE:
The Wire Springs may flip up out of position during this process. Springs will be
repositioned during reassembly.
4. Observe the ends of the Rear Cutter Blade Guard and note the small metal pins protruding
toward the inside. During the Reassembly Procedure, these pins will be mounted into the
corresponding mounting slots in the Cutter Side Panels.
5. To provide complete access to the area to be cleaned, raise the Upper Cutter Blade Guard as
shown in Figure 20.
III. Clean the Cutter Module.
1. Remove any label material which has adhered to the Cutter parts and use a small brush to
remove any paper dust from the Cutter Module.
2. If you use pressure-sensitive media, use a lint-free cloth soaked in an adhesive remover to
remove all gum and label residue from the Cutting Blades and Guards.
If you use tag stock, use alcohol (part # 01426) to remove any dirt.
This procedure is continued on the next page.
Figure 20 Cutter Module Disassembly
3
Routine Care and Adjustment
29