


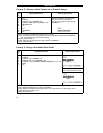


V. Reinstall the Cutter Module.
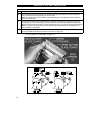
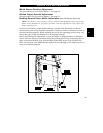
1. See Figure 19. Position the Cutter Module above the Cutter Mounting Posts. Press down on
the Cutter Module until the Mounting Slots engage the Mounting Posts on the printer.
2. See Figure 18. Tighten the Mounting Screw in a clockwise direction to hold the Cutter Module
in Position.
3. See Figure 18. Position the Cutter Cable Connector so the flat side of the connector faces
away from the printer, then insert it up into the mating connector on the Cutter Module.
4. Replace the Cutter Catch Tray onto the two mounting posts located on the front of the Cutter
Module.
VI. Test the Cutter Operation.
1. If necessary, reload ribbon and label stock into the printer, then close the printer’s Front Door
and Media Access Door.
NOTE:
When loading media, make sure the end of the label is positioned on top of the Platen
Roller, then close the Printhead Latch.
2. When the printer is turned ON, the Cutter Module will cycle through one cutting operation and
be ready to print labels.
3. OPTIONAL: Hold in the PAUSE key while turning the printer’s AC power ON. When the Power
ON Self Test begins (all lights ON), release the PAUSE key. When the Power ON Self Test ends,
the printer will automatically print test labels which the Cutter Module will automatically cut.
End of Cutter Cleaning Procedure.
Lubrication
No lubricating agents of any kind are required on this printer.
Some commercially available lubricants will damage the finish if used.
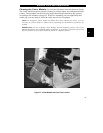
AC Power Fuse Replacement
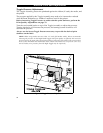
A user-replaceable AC Power Fuse is located just to the left of the Power ON/OFF
Switch. (See Figure 11 on page 19.) For a 110 VAC installation, the replacement Fuse is
a 3AG Fast Blow style rated at 5 Amp/250VAC. For a 220 VAC installation, the Fuse is
the same style but rated at 3 Amp/250VAC .
Before replacing the Fuse, turn the AC Power Switch OFF and unplug the AC Power
Cable.
To replace the Fuse, insert the tip of a flathead screwdriver into the slot in the end of
the Fuse Holder End Cap. Press in slightly on the End Cap and turn the screwdriver
slightly counterclockwise. This will disengage the End Cap from the Fuse Holder and
permit removal of the Fuse. To install a new fuse, reverse the sequence.
Routine Care and Adjustment
32