


ZyWALL 2 Series User’s Guide
LAN Setup 24-3
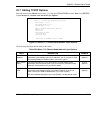
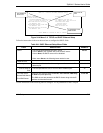
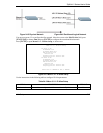
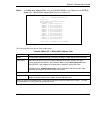
Figure 24-4 Menu 3.2: TCP/IP and DHCP Ethernet Setup
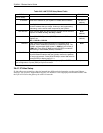
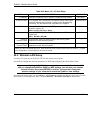
Follow the instructions in the next table on how to configure the DHCP fields.
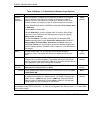
Table 24-1 DHCP Ethernet Setup Menu Fields
FIELD DESCRIPTION EXAMPLE
DHCP This field enables/disables the DHCP server.
If set to Server, your ZyWALL will act as a DHCP server.
If set to None, the DHCP server will be disabled.
When set to Server, the following items need to be set:
Server
Client IP Pool:
Starting Address This field specifies the first of the contiguous addresses in the IP
address pool.
192.168.1.33
Size of Client IP
Pool
This field specifies the size, or count of the IP address pool. 32
First DNS Server
Second DNS Server
Third DNS Server
Press [SPACE BAR] to select From ISP, User Defined, DNS Relay
or None and press [ENTER].
The DNS servers are passed to the DHCP clients along with the IP
address and the subnet mask
From ISP
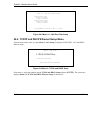
Use the instructions in the following table to configure TCP/IP parameters for the LAN port.
Menu 3.2 - TCP/IP and DHCP Ethernet Setup
DHCP= Server TCP/IP Setup:
Client IP Pool:
Starting Address= 192.168.1.33 IP Address= 192.168.1.1
Size of Client IP Pool= 32 IP Subnet Mask= 255.255.255.0
First DNS Server= From ISP RIP Direction= Both
IP Address= N/A Version= RIP-1
Second DNS Server= From ISP Multicast= None
IP Address= N/A Edit IP Alias= No
Third DNS Server= From ISP
IP Address= N/A
Press ENTER to Confirm or ESC to Cancel:
First address in
the IP Pool
Size of the IP
Pool
IP addresses of the
DNS servers