


Administering Routes 9-11
Displaying the
Routing Table
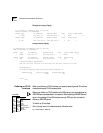
You can display a switching module’s routing table to determine which
routes are configured and whether the routes are operational.
To display the contents of the routing table, enter the following command
string from the top level of the Administration Console:
ip route display
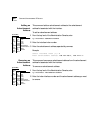
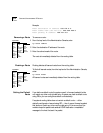
The example shows routes for the LANplex 2500 system. The display
indicates the configuration of RIP. The default route appears as
Default
Route
.
IP routing is enabled, RIP is active, ICMP router discovery is
disabled.
Destination Subnet mask Metric Gateway Status
158.101.4.0 255.255.255.0 2 158.101.2.8 Static
158.101.3.0 255.255.255.0 2 158.101.1.2 Learned(RIP)
158.101.2.0 255.255.255. 1 -- Direct
158.101.1.0 255.255.255.0 1 -- Direct
Default Route -- 5 158.101.1.2 Learned (RIP)
Defining a Static
Route
Before you can define static routes, you must define at least one IP
interface. Static routes remain in the table until you remove them or the
corresponding interface. Static routes take precedence over dynamically
learned routes to the same destination.
Static routes are not included in periodic RIP updates sent by the system.
To define a static route:
1 From the top level of the Administration Console, enter:
ip route static
You are prompted for the route’s parameters. To use the value in brackets,
press [Return] at the prompt.
2 Enter the destination IP address of the route.
3 Enter the subnet mask of the route.
4 Enter the gateway IP address of the route.
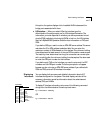
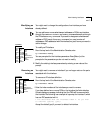
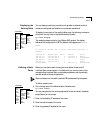
Top-Level Menu
system
ethernet
fddi
atm
bridge
➧ip
ipx
appletalk
snmp
analyzer
script
logout
interface
➧route
arp
atmArpServer
multicast
udpHelper
routing
icmpRouterDiscovery
rip
ping
statistics
➧display
static
remove
flush
default
noDefault
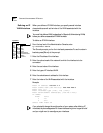
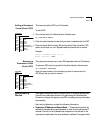
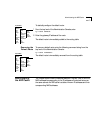
Top-Level Menu
system
ethernet
fddi
atm
bridge
➧ip
ipx
appletalk
snmp
analyzer
script
logout
interface
➧route
arp
atmArpServer
multicast
udpHelper
routing
icmpRouterDiscovery
rip
ping
statistics
display
➧static
remove
flush
default
noDefault