


AT-WA7500 and AT-WA7501 Installation and User’s Guide
133
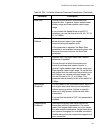
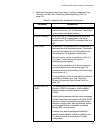
The designated bridge must be configured so that the Secondary LAN
Bridge Priority value is a non-zero number.
The designated bridge must have at least one radio set to Station
mode, or the designated bridge must be the endpoint of an IP tunnel
(as defined in “About IP Tunnels” on page 140).
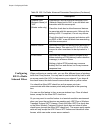
If more than one access point meets these requirements, the access point
with the highest secondary LAN bridge priority is the designated bridge. If
two access points have the same secondary LAN bridge priority, the
access point with the highest Ethernet address becomes the designated
bridge. If the designated bridge goes offline, the remaining access points
negotiate to determine which access point becomes the new designated
bridge.
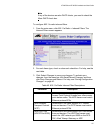
To configure a designated bridge
1. Using the selection criteria listed earlier in this section, determine
which access point to configure as the designated bridge.
2. On that access point, from the main menu click Spanning Tree
Settings. The Spanning Tree Settings screen appears.
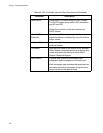
3. Configure the LAN ID. All access points that want to participate in the
spanning tree must have the same LAN ID.
4. Set the Root Priority parameter to zero. All access points on the
secondary LAN should have a root priority of zero.
5. Verify that the Enable Ethernet Bridging check box is checked.
6. Set the Secondary LAN Bridge Priority to be the highest number of all
access points on the secondary LAN. The range is 1 to 7. The value 1
is the highest priority.
7. Set the Secondary LAN Flooding parameter to Enabled.
8. Click Submit Changes to save your changes. To activate your
changes, from the menu bar click Save/Discard Changes, and then
click Save Changes and Reboot. For help, see “Saving Configuration
Changes” on page 46.