


Chapter 2: Installing the Access Points
54
Installing the AT-WA7500
You can place the AT-WA7500 horizontally on a desk or counter. The
AT-WA7500 also ships with a mounting bracket that lets you mount it
vertically to a wall. Additional mounting options that you can use with the
mounting bracket include a cubicle bracket that lets you mount the
AT-WA7500 on a cubicle wall or in a locking bracket.
Cubicle bracket kit
Locking bracket kit
To order one of these kits, contact your Allied Telesyn representative.
Allied Telesyn also offers a variety of antennas and antenna accessories.
For more information, see “Antennas and Antenna Accessories” on page
247.
To install the AT-WA7500, do the following:
1. Attach the antenna or antennas. For more information, see “External
Antenna Placement Guidelines” on page 60.
Note
If the AT-WA7500 has an 802.11a full-range radio, you must use the
antennas that are already attached to the antenna connectors.
2. Mount the AT-WA7500. For help see the AT-WA7500 Quick Install
Guide and the instructions that shipped with the bracket kit.
3. Connect the AT-WA7500 to your wired LAN (unless you are using it as
a WAP). For help, see “Connecting the AT-WA7500 to Your Wired
LAN and Power” on page 54.
4. Connect the AT-WA7500 to power. For help, see “Connecting the
AT-WA7500 to Your Wired LAN and Power” on page 54.
When you are done installing the access points, you need to configure
them to communicate with your network.
Connecting the
AT-WA7500 to
Your Wired LAN
and Power
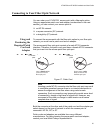
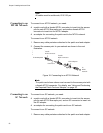
Unless you are using the AT-WA7500 as a WAP, you must connect it to
your Ethernet network. To connect the AT-WA7500 to your Ethernet
network and to power, you must first connect it to a power bridge or
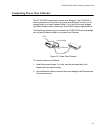
another 802.3af-power bridge. For help, see “Connecting Power Over
Ethernet” on page 59 and the documentation that shipped with your power
bridge.