


Quick Start Guide
10
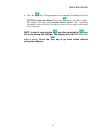
Loading and Feeding the Ribbon
Thermal transfer applications require a ribbon. Direct Thermal users go to the
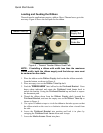
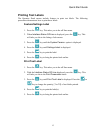
next step. Figure 4 shows the feed path for the ribbon.
Figure 4 – Thermal Transfer Ribbon Feed Path
NOTE: If installing a ribbon with width less than the maximum
ribbon width, both the ribbon supply and the take-up core must
be centered on the shafts.
1. Place the ribbon on the Ribbon Supply shaft so that the ribbon unwinds
from the bottom, as shown in Figure 4.
2. Place an empty core on the Ribbon Take-Up shaft.
3. Find the “PRESS HERE” label affixed to the Printhead Bracket. Press
down where indicated and rotate the Printhead Lock Lever back to
unlock the bracket. Swing the Printhead Bracket up and back to expose
the document path.
4. Thread the ribbon down from the Ribbon Supply shaft, beneath the
Printhead Bracket, and onto the empty core on the Ribbon Take-Up as
shown in Figure 4.
5. Use a piece of adhesive tape to attach the ribbon to the take-up core so that
the ribbon winds on the core in a clockwise direction when viewed from
the side.
6. Lower the Printhead Bracket into position and lock it in place by
swinging the Printhead Lock Lever down until it stops.
7. Lower the Media Access Cover into place.
Ribbon Take-Up Ribbon
Supply Roll
Ribbon
Guide Bar