


DS62-Network, DS62-MD4 Network/Modem Host Module
8
5. Select ‘C’ for the configuration menu.
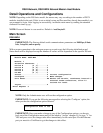
6. Select the HOST module. You should see a menu similar to (Figure 2).
7. Select the number for ‘Login Setup’ option. You should see a menu similar to (Figure 3).
8. Select the number for ‘Manage Users’ option. You should see a menu similar to (Figure 4).
9. NOTE: The ‘root’ user can not be deleted.
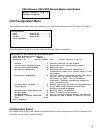
10. Select ‘A’ to add user. Type the name and password at the prompts.
11. Press ‘Enter’ until get to the ‘Login Setup Menu’ (Figure 3).
12. Select option ‘Access Control’ to enable or disable the Tenet and Serial Login Prompt.
13. Press ‘Enter’ until you get the Configuration menu (Figure 2).
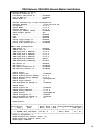
14. Select ‘Network Port Configuration’ option. You should see a menu similar to (Figure 5).
15. If your System Administrator requires you to use DHCP, then select ‘DHCP Enable/Disable’
and type ‘Y’ to enable DHCP. If you wish to assign a static IP address to this unit, disable the
DHCP and go to step 18.
16. Press ‘Enter’ until you are asked to ‘Accept Changes’. Type ‘Y’ to accept changes or ‘N’ to
decline changes.
17. After Accepting or Declining Changes Pres ‘Enter ‘ until you get the Network Access Menu
(Figure 1).
18. Select ‘Unit reset’ to update the external connections. Once the reset is completed (1 minute)
connect the Baytech device to your network using an Ethernet cable.
19. If you disabled the DHCP in step 15, you should see a menu similar to (Figure 5).
20. Select the ‘IP Address’ option and type the assigned IP address and press ‘Enter’.
21. Select the ‘Subnet Mask’ option and type the assigned subnet mask address and press
‘Enter’.
22. Select the ‘Gateway Address’ option and type the assigned Gateway address and press
‘Enter’.
23. Press ‘Enter’ until you are asked to ‘Accept Changes’. Type ‘Y’ to accept changes.
24. Press ‘Enter’ until you get the Network Access Menu, (Figure 1).
25. Select ‘Unit reset’ to update the external connections. Once the reset is completed (1 minute)
connect the Baytech device to your network using an Ethernet cable.
At this point you have enough basic configurations needed to operate this Baytech unit.
Serial Setup
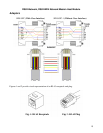
• Verify JMP5 is set to pins 1 and 2 on the DS62 module.
• Connect the 9FRJ45PC-4 adapter to the user’s computer
• Connect the Host Module’s EIA-232 port to the adapter via the RJ08X007 rolled flat ribbon
cable.
• Use terminal emulation software to access the unit, 9600 bps, 8 data bits, 1stop bit and no
parity.
NOTE: At any time during the session you need to go to another menu, use the Attention
Character = semi-colon (;). Press the attention character key 5 consecutive times to get back to the
main status menu.