4-6
Confidential
<Procedures>
After the installation procedure of the Brother Maintenance USB Printer driver is
completed, refer to the following steps for the detailed procedures to rewrite the program
files. If the Brother Maintenance USB Printer Driver has already been installed to your PC,
start to rewrite the program files.
(1) Connect the PC and machine with the USB cable.
(2) Open the front cover, and turn the power supply of the machine on while holding down
the SW supporter. Make sure that the Toner/Drum/Error LED lights up, and release the
SW supporter, Make sure that all LEDs are off, and press the SW supporter four times.
Then, make sure that the Toner/Drum/Error LED lights up, and close the front cover.
(The USB serial number is fixed to “B01234567890”.)
(3) Start the PC. When doing this operation at the first time, the Plug & Play program is
performed, and the driver is installed.
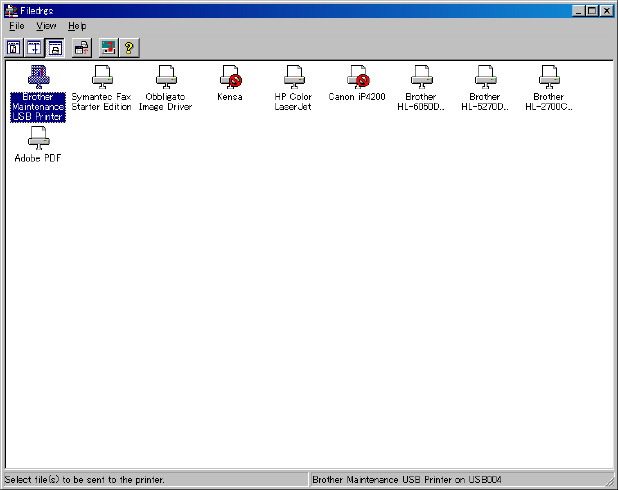
(4) Open the “hl2100” folder and double-click the FILEDG32.EXE icon to start. Make sure
that there is the printer icon of the connected machine, and that no error occurs.
(5) Click the Brother Maintenance USB printer driver in FILEDG32 to select.
(6) Drag the firmware (LZ...........) in the same folder and drop it onto the icon of the
applicable model in FILEDG32.
The files in the firmware are sent to the machine so that they are started to write into
the flash ROM automatically. After finishing receiving the files, the machine starts to
rewrite the firmware.
The Ready LED and Error LED blink irregularly while the firmware being rewritten. The
[Go] / Toner / Drum / Error LEDs light up when rewriting the firmware is completed. Be
sure not to disconnect the USB cable or to turn off the power supply of the PC before
the rewriting is completed.
(7) Turn the power supply of the machine off.


