


Confidential
5-26
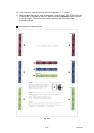
1.4.17 Adjustment of Color Registration (Maintenance Mode 66)
<Function>
This function automatically adjusts color registration. If automatic adjustment of color
registration fails, you can adjust color registration manually.
<Operating Procedure>
Automatic Adjustment of Color Registration
(1) Press the 6 button twice in the initial stage of the maintenance mode.
”REGISTRATION” is displayed on the LCD.
(2) Press the OK button.
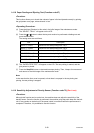
”REGISTRATION/ PLEASE WAIT” is displayed on the LCD, and adjustment of color
registration is automatically done.
(3) When this operation is completed without an error, “REGISTRATION/ COMPLETED” is
displayed on the LCD. When you press the Stop/Exit button, a buzzer sounds for approx.
1 sec, and the machine returns to the initial stage of the maintenance mode.
When an error message is displayed on the LCD, take the measures described in the
table below.
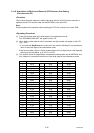
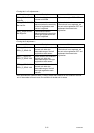
Error message Measure
REGISTRATION
FAILD
Adjust color registration manually in accordance with the
procedure for manual adjustment of color registration
given below.
REGISTRATION
TONER EMPTY <color>
Replace the empty toner cartridge, and then conduct the
auto adjustment of color registration again.
NO PAPER
LOAD <size> PAPER
Replenish paper of the size specified in the display on
the tray, and then conduct the auto adjustment of color
registration again.
* In the <color> field, the toner color of which cartridge becomes empty is displayed.
* In the <size> field, “LETTER” or “A4” is displayed. “LETTER” is displayed on the models
of which default size is LETTER, and “A4” is displayed on the models of which default
size is A4.
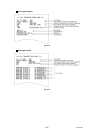
Manual Adjustment of Color Registration
(1) Press the 6 button twice in the initial stage of the maintenance mode.
”REGISTRATION” is displayed on the LCD.
On the tray, load LETTER-size paper in the case of the models of which default size is
LETTER, and A4-size paper in the case of the models of which default size is A4.
(2) Press the ▲ or ▼ button to display “PRINT CHART” on the LCD, and then press the OK
button.
(3) Display “PRINT CHART/ PRINTING” on the LCD, and print the color registration
adjustment chart (next page).
(4) Press the ▲ or ▼ button to display “OFFSET ADJSUT” on the LCD, and then press the
OK button. “1. M LEFT/ 0” is displayed on the LCD.
(5) With the printed color registration adjustment chart, check the numeric value where the
color is the darkest among the pattern 1 (Magenta Left). Press the or button to
display that numeric value, and then press the Black Start button.