


Chapter 2 Setting Up the Printer 23
4. Choose Control Panel from the Main Group window in the Program
Manager.
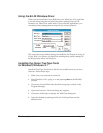
5. Open the Printers icon. The Printers dialog box appears.
N
Your screen may show printers in the Installed Printers box. This means
other printers have been installed for your system; this should not cause
any problems.
6. Choose the Add button to display the List of Printers box.
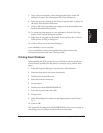
7. Select Install Unlisted or Updated Printer from the beginning of the
List of Printers, and then choose Install. A dialog box appears
instructing you to insert the diskette that contains the printer driver.
8. Insert the diskette containing the Canon BJ-30 printer driver for
Windows into disk drive A and select OK. (If you are not using drive
A, you can enter the pathname that identifies the drive you are using or
use Browse to locate the drive.)
9. Choose Canon BJ-30 from the List of Printers and select OK. The
Control Panel installs the files for the BJ-30 printer driver on your hard
disk. The Printers dialog box appears with the Canon BJ-30 listed in the
Installed Printers box.
10. If you need to change the port designation, make sure the Canon BJ-30
is selected in the Installed Printers box. Then select the Connect button
to display the Connect dialog box.
11. Choose your port and select OK.
12. If you want to use the BJ-30 for all of your work, make sure Canon
BJ-30 is highlighted and select the Set As Default Printer button from
the Printers dialog box.
13. Select the Close button to complete the installation of the Canon BJ-30
printer driver for Windows.
N
For faster printing operations in Windows, do not use the Windows Print
Manager.
Setting Up the
Printer