


If the copy countis ‘180’ or higher and ‘348’ or lower and has not changed, go to step
17). Or, if 10’s and 100’s do not change, go to step 17);
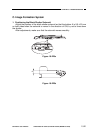
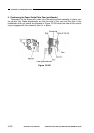
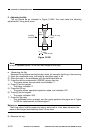
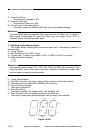
14) Loosen the fixing screw w slightly; i.e., move it to the left about 1 mm.
15) Turn the adjusting screw e so that the copy count is ‘180’ or higher’ and ‘348’ or
lower.
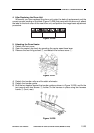
Caution:
Adjust so that 10’s and 100’s will not change; ignore 1’s may change ±5.)
• A clockwise turn decreases the reading.
• A counterclockwise turn increases the reading.
Figure 10-237
16) When the reading in the copy counter is appropriately correct, tighten the screw w;
make sure that the reading is appropriate after tightening the screw.
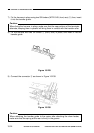
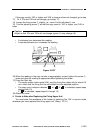
17) Press the Start key.
• The copier enters check mode (404), and the fixing film rotates idly for about 2.5
min; check that the fixing film has not shifted from the adjusted position.
• The copy count indicator indicates “ ” or “ ”; if “ ” is indicated, repeat steps
starting with 13).
If “ ” is indicated, repeat steps 4) through 10).
18) Attach the cover.
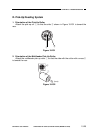
4. Points to Note after Replacing the Fixing Upper Unit
You must enter the resistance of the heater by selecting ‘No. 304’ in service mode
whenever you have replaced the fixing upper unit. (See p. 10-31.)
10-29
CHAPTER 10 TROUBLESHOOTING
COPYRIGHT
©
1997 CANON INC. CANON NP6218 REV. 0 MAY 1997 PRINTED IN JAPAN (IMPRIME AU JAPON)
e
w