


Implementing OSPF on Cisco IOS XR Software
How to Implement OSPF on Cisco IOS XR Software
RC-161
Cisco IOS XR Routing Configuration Guide
• For a virtual link to be successful, you need a stable router ID at each end of the virtual link. You
do not want them to be subject to change, which could happen if they are assigned by default (See
the “OSPF Process and Router ID” section on page RC-134 for an explanation of how the router ID
is determined.) Therefore, we recommend that you perform one of the following tasks before
configuring a virtual link:
–
Use the router-id command to set the router ID. This strategy is preferable.
–
Configure a loopback interface so that the router has a stable router ID.
• Before configuring your virtual link for OSPF Version 2, you must decide whether to configure plain
text authentication, MD5 authentication, or no authentication (which is the default). Your decision
determines whether you need to perform additional tasks related to authentication.
Note If you decide to configure plain text authentication or no authentication, see the authentication
command provided in the OSPF Commands on Cisco IOS XR Software module in the Cisco IOS XR
Routing Command Reference.
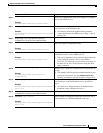
SUMMARY STEPS
1. show ospf [process-name]
or
show ospfv3 [process-name]
2. configure
3. router ospf process-name
or
router ospfv3 process-name
4. router-id {ipv4-address | interface-type interface-instance}
5. area area-id
6. virtual link router-id
7. authentication message-digest
8. message-digest-key key-id md5 {key | clear key | encrypted key}
9. Repeat all of the steps in this task on the ABR that is at the other end of the virtual link. Specify the
same key ID and key that you specified for the virtual link on this router.
10. end
or
commit
11. show ospf [process-name] [area-id] virtual-links
or
show ospfv3 [process-name] virtual-links