


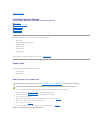
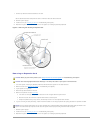
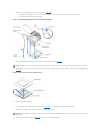
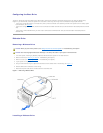

7. Remove the microprocessor fan and heat sink assembly (see Figure6-5):
a. Press down on the release tabs on the heat-sink retention clips to release the clips from the retaining tabs on the ZIF socket.
b. Lift the assembly away from the microprocessor.
Figure 6-5.RemovingtheMicroprocessorFanandHeatSinkAssembly
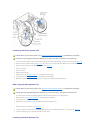
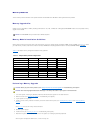
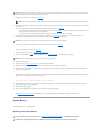
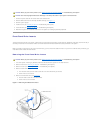
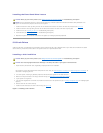
8. Pull the microprocessor socket release lever upward to the fully open position (see Figure6-6).
9. Lift the microprocessor out of the socket and leave the release lever in the open position so that the socket is ready for the new microprocessor (see
Figure6-6).
Figure 6-6. Removing and Installing a Microprocessor
10. Unpack the new microprocessor.
If any of the pins on the microprocessor appear bent, see "Getting Help" for instructions on obtaining technical assistance.
11. Ensure that the microprocessor socket release lever is in the fully open position.
12. Align pin 1 on the microprocessor (see Figure6-6) with pin 1 on the microprocessor socket.
NOTICE: Be careful not to bend any of the pins when removing the microprocessor. Bending the pins can permanently damage the microprocessor.
NOTICE: The microprocessor and system board can be damaged if the microprocessor socket release lever is not fully open when you insert the new
microprocessor.