


b. Replace the four screws that secure the drive bay in the system.
8. Connectallpowercablesandinterfacecablestotheharddrivesremaininginthedrivebay.
9. Stand the system upright.
10. Install the cover (see "Installing the Cover" in "Troubleshooting Your System").
11. Reconnect the system to its electrical outlet and turn the system on, including any attached peripherals.
Installing a Non-Hot-Plug Hard Drive
1. Unpack the drive (and controller card, if applicable), and prepare the drive for installation.
For instructions, see the documentation that accompanied the drive. Also, see "IDE Configuration Information" or "SCSI Configuration Information" for
information on configuring the drive.
2. Turn off the system, including any attached peripherals, and disconnect the system from the electrical outlet.
3. Remove the cover (see "Removing the Cover" in "Troubleshooting Your System").
4. Lay the system on its right side.
5. If the drive was supplied with a controller card, install the controller card in an expansion slot (see "Installing an Expansion Card" in "Installing System
Options").
6. Disconnect all power cables and interface cables from the hard drives in the drive bay.
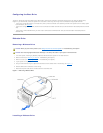
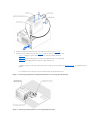
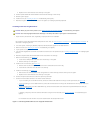
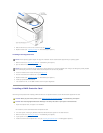
7. Remove the hard-drive bay (see Figure7-7):
a. Loosen the four Phillips-head screws that secure the drive bay in the system.
b. Slide the drive bay out of the system.
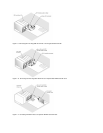
8. Install the drive in the drive bay (see Figure7-7):
a. Slide the drive into the drive bay with the back of the drive toward the back of the drive bay.
b. Install the two screws that secure the drive in the drive bay.
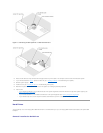
9. Install the hard-drive bay (see Figure7-7):
a. With the side of the drive bay labeled "Top" facing toward the external drive bays, slide the drive bay into the system.
b. Replace the four screws that secure the drive bay in the system.
10. Connect a DC power cable connector to the drive's power input connector.
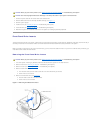
11. Connect the interface cable connector to the drive's interface connector:
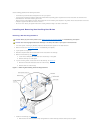
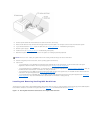
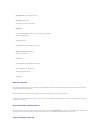
l If you are installing one or two IDE hard drives, connect the interface cable between the drive(s) and the system board (see Figure7-8).
l If you are installing one or more SCSI hard drives, connect the interface cable to the drive(s) and the SCSI controller on the system board (see
Figure7-9).
l If you are installing drives in an IDE or SCSI RAID array, connect the interface cable to the drives and the optional RAID controller card (see
Figure7-10 or Figure7-11).
If necessary, temporarily remove the baffle to allow easier routing of the interface cable (see "Removing the Baffle" in "Troubleshooting Your
System").
For information about the controller card, see the documentation that accompanied the card.
Figure 7-8. Connecting IDE Hard Drives to the Integrated IDE Controller
CAUTION: Before you perform this procedure, see "Safety First—For You and Your System" in "Troubleshooting Your System."
CAUTION: See "Protecting Against Electrostatic Discharge" in the safety instructions in your System Information Guide.