


Use the following guidelines when installing hard drives:
l You should only use drives tested and approved for use in your system.
l You may need to use different programs than those provided with the operating system to partition and format a hard drive. See the hard drive's
documentation for information on setting up the drive.
l When you format a high-capacity hard drive, allow enough time for the formatting to be completed. Long format times for these drives are normal. For
example, a large drive can take over an hour to format.
l Do not turn off or reboot your system while the drive is being formatted. Doing so can cause a drive failure.
Installing and Removing Non-Hot-Plug Hard Drives
Removing a Non-Hot-Plug Hard Drive
1. Turn off the system, including any attached peripherals, and disconnect the system from the electrical outlet.
2. Remove the cover (see "Removing the Cover" in "Troubleshooting Your System").
3. Lay the system on its right side.
4. Disconnect all power cables and interface cables from the hard drives in the drive bay.
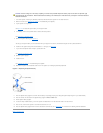
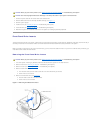
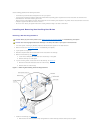
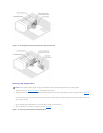
5. Remove the hard-drive bay (see Figure7-7):
a. Loosen the four Phillips-head screws that secure the drive bay in the system.
b. Slide the drive bay out of the system.
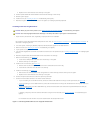
6. If you are removing a drive, remove the drive from the drive bay (see Figure7-7):
a. Remove the two screws that secure the drive in the drive bay.
b. Slide the drive out of the drive bay.
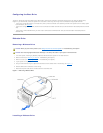
Figure 7-7. Removing and Installing a Non-Hot-Plug Hard Drive
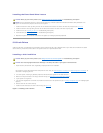
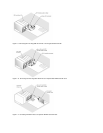
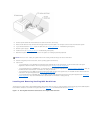
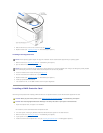
7. Install the hard-drive bay (see Figure7-7):
a. With the side of the drive bay labeled "Top" facing toward the external drive bays, slide the drive bay into the system.
CAUTION: Before you perform this procedure, see "Safety First—For You and Your System" in "Troubleshooting Your System."
CAUTION: See "Protecting Against Electrostatic Discharge" in the safety instructions in your System Information Guide.