


78 Adding Parts
www.dell.com | support.dell.com
FILE LOCATION:
FILE LOCATION:FILE LOCATION:
FILE LOCATION: C:\Projects\Green_Lantern_solutions\2H930c31.fm
DELL CONFIDENTIAL – PRELIMINARY 11/20/01
DELL CONFIDENTIAL – PRELIMINARY 11/20/01DELL CONFIDENTIAL – PRELIMINARY 11/20/01
DELL CONFIDENTIAL – PRELIMINARY 11/20/01
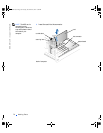
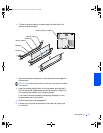
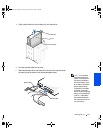
HINT: Two sets of rails
are attached to the inside
of the computer cover.
Use the two longer rails
on 5.25-inch drives.
Use the shorter rails for
3.5-inch drives. Rails for
a second hard drive are
attached inside the hard-
drive bay.
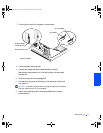
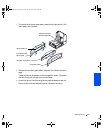
6
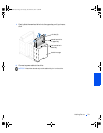
Remove the two green plastic rails from the inside of the hard-drive
bay.
These rails are not attached to the inside of the hard-drive bay with
screws. To remove the rails, gently pull the rails up and out of the bay.
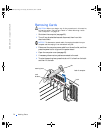
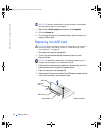
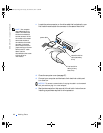
7 Attach the rails to the hard drive using the two screws attached to the
rails.
Ensure that the rail tabs are positioned at the back of the hard drive.
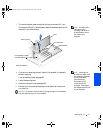
NOTICE: Do not install any drive into the lower hard-drive bay until after you
have removed the green drive rails from the inside of the hard-drive cage.
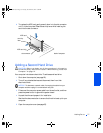
8
Remove the first hard drive from the upper bay and install it in the
lower bay:
a Disconnect the power cable and the data cable from the back of
the first hard drive.
b Press in the two green rail tabs and pull the first hard drive out of
the upper bay.
c Gently slide the first hard drive into the lower bay until you hear a
click.
d Reconnect the power cable and the data cable to the back of the
first hard drive.
2H930bk1.book Page 78 Tuesday, November 20, 2001 5:02 PM