


102 Installing System Components
Installing the Control Panel Assembly
CAUTION: Many repairs may only be done by a certified service technician.
You should only perform troubleshooting and simple repairs as authorized in
your product documentation, or as directed by the online or telephone service
and support team. Damage due to servicing that is not authorized by Dell is
not covered by your warranty. Read and follow the safety instructions that came
with the product.
1
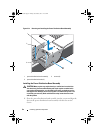
Place the control panel assembly onto the front of the system and secure in
place with the two screws.
2
Replace the control panel assembly cover and secure it with the screw.
3
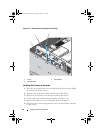
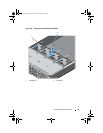
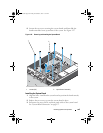
Connect the LED signal cable to the front panel connector on the system
board. See Figure 5-3.
4
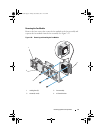
Replace the cable cover making sure that the cables are not crimped.
5
Replace the cooling shroud. See "Installing the Cooling Shroud" on
page 61.
6
Replace the system cover. See "Closing the System" on page 59.
7
Reconnect the system and peripherals to their electrical outlets,
and turn on the system.
System Battery
Removing the System Battery
WARNING: There is a danger of a new battery exploding if it is incorrectly
installed. Replace the battery only with the same or equivalent type recommended
by the manufacturer. See your safety information for additional information.
CAUTION: Many repairs may only be done by a certified service technician.
You should only perform troubleshooting and simple repairs as authorized
in your product documentation, or as directed by the online or telephone
service and support team. Damage due to servicing that is not authorized by Dell
is not covered by your warranty. Read and follow the safety instructions that
came with the product.
1
Turn off the system, including any attached peripherals, and disconnect
the system from the electrical outlet.
2
Open the system. See "Opening the System" on page 58.
book.book Page 102 Friday, November 8, 2013 11:29 AM