


Installing System Components 67
7
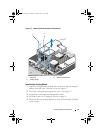
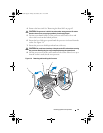
Align the notches in the processor with the socket keys on the ZIF socket.
See Figure 3-9.
8
With the release lever on the processor socket in the open position, align
the processor with the socket keys and set the processor lightly in the
socket. See Figure 3-9.
CAUTION: Do not use force to seat the processor. When the processor is
positioned correctly, it engages easily into the socket.
9
Close the processor shield.
10
Rotate the socket release lever down until it snaps into place. See
Figure 3-9.
11
Using a clean lint-free cloth, remove the thermal grease from the heat sink.
12
Open the grease packet included with your processor kit and apply thermal
grease evenly to the center of the top of the new processor.
CAUTION: Using excess thermal grease can cause grease to contact the
processor shield, which can cause contamination of the processor socket.
13
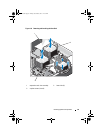
Install the heat sink. See "Installing the Heat Sink" on page 64.
14
Replace the cooling shroud. See "Installing the Cooling Shroud" on
page 61.
15
Close the system. See "Closing the System" on page 59.
16
Reconnect the system and peripherals to their electrical outlets, and turn
on the system.
17
Press <F2> to enter the System Setup program, and check that the
processor information matches the new system configuration. See "System
Setup Options at Boot" on page 38.
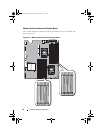
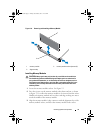
System Memory
Your system supports DDR3 registered DIMMs (RDIMMs). Single-, dual-
and quad-rank DIMMs can be 800, 1066 or 1333 MHz.
The system contains 18 memory sockets split into two sets of nine sockets
with one set for each processor. Each nine-socket set is organized into three
channels of three memory sockets per channel.
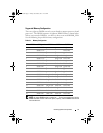
The maximum memory that is supported on your system varies according to
the types and sizes of memory modules being used:
book.book Page 67 Friday, November 8, 2013 11:29 AM