


66 Installing System Components
Installing the Processor
NOTE: When installing only one processor, the processor must be installed in CPU0
socket (for the socket location, see Figure 5-3).
NOTE: Your system uses an LGA 1366 socket, which is designed for trouble free
insertion of the CPU. After placing the CPU into the socket, press the lever down
and lock in place. If you notice any resistance when inserting the CPU, ensure that
it is aligned correctly.
NOTE: After removing the processor, place it in an antistatic container for reuse,
return, or temporary storage. Do not touch the bottom of the processor. Touch only
the side edges of the processor.
NOTE: If you are permanently removing the processor, you must install a processor
blank and a heat-sink blank to ensure proper system cooling. Adding the blank is
similar to installing a processor.
1
If you are upgrading your processors, prior to upgrading your system,
download and install the latest system BIOS version from
support.dell.com
. Follow the instructions included in the file and
download to install the update on your system.
2
Pull the locking lever of the processor socket out and up.
3
Unpack the processor if it has not been used previously.
If the processor has already been used, remove any thermal grease from the
top of the processor using a lint-free cloth.
4
Locate the pin 1 indicator on the system board socket.
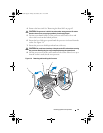
5
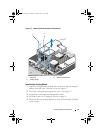
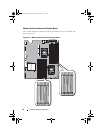
Locate the pin 1 indicator on the top of the processor. See Figure 3-9.
The pin 1 indicator is shown as a triangle on the top of the processor.
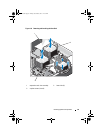
6
Place the processor over the socket with pin 1 aligned with the pin guide
on the processor socket.
CAUTION: Positioning the processor incorrectly can permanently damage the
system board or the processor. Be careful not to bend the pins in the ZIF socket.
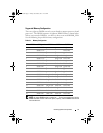
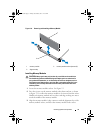
1 processor shield 2 notches in processor (2)
3 ZIF socket 4 pin1 indicator
5 socket-release lever 6 processor
book.book Page 66 Friday, November 8, 2013 11:29 AM