


104 Installing System Components
5
Reconnect the system to the electrical outlet and turn the system on,
including any attached peripherals.
6
Enter the System Setup program to confirm that the battery is operating
properly. See "Using the System Setup Program" on page 37.
7
Enter the correct time and date in the System Setup program's
Time
and
Date
fields, and re-enter any customized option settings as needed.
8
Exit the System Setup program.
System Board
WARNING: Whenever you need to lift the system, get others to assist you.
To avoid injury, do not attempt to lift the system by yourself.
CAUTION: Many repairs may only be done by a certified service technician.
You should only perform troubleshooting and simple repairs as authorized in
your product documentation, or as directed by the online or telephone service
and support team. Damage due to servicing that is not authorized by Dell is
not covered by your warranty. Read and follow the safety instructions that
came with the product.
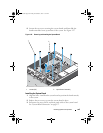
Removing the System Board
1
Turn off the system and attached peripherals, and disconnect the system
from the electrical outlet.
2
Open the system. See "Opening the System" on page 58.
3
Remove the cooling shroud. See "Removing the Cooling Shroud" on
page 60.
4
Remove all memory modules. See "Removing Memory Modules" on
page 72.
5
Remove the expansion card-riser. See "Removing the Expansion-Card
Riser" on page 75.
6
Remove the heat sinks. See "Removing the Heat Sink" on page 62.
7
Remove the processors. See "Removing the Processor" on page 64.
8
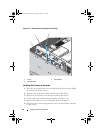
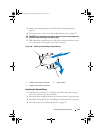
Disconnect the power, SATA, and front panel cables from the system
board.
CAUTION: Do not lift the system board assembly by grasping a memory module,
processor, or other components.
book.book Page 104 Friday, November 8, 2013 11:29 AM