Completing the Installation Hardware Preparation and Installation
MVME7100 Single Board Computer Installation and Use (6806800E08A)
45
2.7 Completing the Installation
The MVME7100 is designed to operate as an application-specific compute blade or an
intelligent I/O board/carrier. It can be used in any slot in a VME chassis. When the MVME7100
is installed in a chassis, you are ready to connect peripherals and apply power to the board.
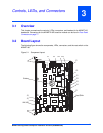
Figure 3-1 on page 47 and Figure 5-1 on page 75 show the locations of the various connectors
on the MVME7100 and MVME7216E.
The console settings for the MVME7100 are:
z Eight bits per character
z One stop bit per character
z Parity disabled (no parity)
z Baud rate of 9600 baud
Verify that hardware is installed and the power/peripheral cables connected are appropriate for
your system configuration.
Replace the chassis or system cover, reconnect the chassis to the AC or DC power source, and
turn the equipment power on.
2.8 Factory Installed Linux
A bootable ramdisk based Linux image based on the 2.6.25 kernel is available in NOR flash. To
boot this image, use the following MOTLOAD commands:
MVME7100> bmw -af8000000 -bf8f00000 -c4000000
MVME7100> execP -l4000400
The image should boot to the following prompt:
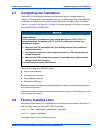
Product Damage
RJ-45 connectors on modules are either twisted-pair Ethernet (TPE) or E1/T1/J1
network interfaces. Connecting an E1/T1/J1 line to an Ethernet connector may
damage your system.
z Make sure that TPE connectors near your working area are clearly marked as
network connectors.
z Verify that the length of an electric cable connected to a TPE bushing does not
exceed 100 meters.
z Make sure the TPE bushing of the system is connected only to safety extra low
voltage circuits (SELV circuits).
If in doubt, ask your system administrator.


