


Chapter 2 Basic Operation
))))))))))))))))))))))))))))))))))))))))))))
))))))))))))))))))))))))))))))))))))))))))))
410 Operators Manual 13
2.4.2 PEEL-AND-DISPENSE MODE
1. Follow the paper loading in the normal and tag mode directions.
2. Remove enough labels to expose about two feet of backing paper.
3. Insert the stock into the printer and allow about three inches to protrude out of the
front.
4. Make sure the leading edge of the backing paper is square and straight. (Tear at
perforation or cut if necessary)
5. Insert the leading edge of the backing paper between the black drive roller and the
white pinch roller, making sure it is positioned evenly between the rollers.
6. Press and hold the print button and feed the backing paper completely through
the rollers until about three inches protrude out of the printer.
7. Firmly push the head lift lever and press the feed button until most of the slack is
taken out, then release the lift lever.
8. Continue feeding paper until labels are reached. To avoid a paper jam, remove
the labels as they start to peel.
9. Enable the peel-and-dispense mode using the ^A1^D98<CR> command
described in this manual.
*If the label height is over 2", a label support rack should be used. This rack will
support the peeled label until it is removed.
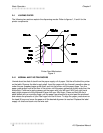
2.5 CLEARING LABEL MISFEEDS: DIAPHRAGM REMOVAL
The purpose of the label diaphragm is to provide a smooth path for labels through the printer and
provide an easy means of removing label misfeeds. If a label misfeed occurs, remove the supply
roll shaft at rear of printer. Remove the four black thumb nuts which hold the diaphragm sheets
in place. Gently slip the sheets off the threaded studs. Once the sheets are removed, clean all
foreign matter and any adhesive gum. To replace the sheets repeat this process in reverse.