


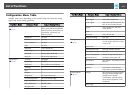


Submenu Function
Super-resolution
To display a crisp image, you can reduce the blurring that is
created on the edge when the image data is scaled up to fit the
panel resolution of the image signal.
Noise Reduction
(This cannot be set when Image Processing is set to Fast.)
Smoothes out the roughness in progressive images. There are
two modes. Select the setting that best suits your environment. It
is recommended that this is set to Off when viewing image
sources in which noise is very low, such as for DVDs.
Mosquito NR
(This cannot be set when Image Processing is set to Fast.)
When a progressive signal is being input, you can reduce the
wavy noise that occurs in lines between areas with dramatic
changes in colors.
Video Range
Select the video range for the input signal from the HDMI input
port, the DVI-D input port, HDBaseT port, or the SDI input port.
Set to Expanded if you are concerned about misadjusted black
levels or blown out highlights in the image.
Input Signal
You can select an input signal from the Computer input port or
BNC input port.
If set to Auto, the input signal is set automatically according to
the connected equipment.
If colors do not appear correctly when set to Auto, select the
appropriate signal according to the connected equipment.
Video Signal
You can select an input signal from the Video input port or S-
Video input port. If set to Auto, video signals are recognized
automatically. If interference appears in the image or a problem
occurs such as no image is being projected when set to Auto,
select the appropriate signal according to the connected
equipment.
Aspect
You can set the
aspect ratio
g
for projected images.
s "Changing the Aspect Ratio of the Projected Image" p.72
Scale
When using multiple projectors to project one image, adjust the
range of the image displayed by each projector.
s "Combining Scaled Images" p.89
Submenu Function
Overscan
(This setting can only be adjusted when a Component Video
signal or RGB-Video signal is being input.)
Changes the output image ratio (the range of the projected
image). You can set the cropping range to 4% or 8%. When set to
Auto, this is automatically adjusted according to the input signal.
Image Process‐
ing
Changes settings for image processing.
Fine: Images are displayed in higher quality.
Fast: Images are displayed quicker.
Reset
You can reset all adjustment values on the Signal menu to their
default settings, except for Input Signal and Image Processing.
See the following to return all menu items to their default
settings.
s "Reset Menu" p.138
List of Functions
120