


Parity No
Stop bits 1
Flow Control None
Table 4-2: Serial line parameters
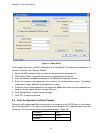
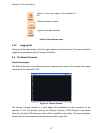
1. Power off the unit.
2. Power on the unit and immediately press the <ESC> key.
3. After the boot up sequence is completed, a “=>” prompt will appear.
4. Type “config” and press the <Enter> key and wait for the configuration questions to appear.
5. For each question, type in the desired settings, or press <Enter> to accept the default value
shown in square parenthesis [ ].
6. The parameters that can be set are as follows:
IP auto configuration (none/dhcp/bootp) [dhcp]:
With this option, the user can specify whether the freeView IP 100 gets its network settings from
a DHCP or BOOTP server. For DHCP, enter “dhcp”, and for BOOTP enter “bootp”. If neither
option is selected, the IP auto configuration is disabled and the network settings will need to be
configured manually.
IP [192.168.1.22]:
The IP address of the unit. This option is only applied if IP auto configuration is set to none.
Net mask [255.255.255.0]:
The subnet mask of the unit. This option is only applied if IP auto configuration is set to none.
Gateway (0.0.0.0 for none) [0.0.0.0]:
The IP address of the default gateway of the device. If a default gateway is not available, enter
0.0.0.0. This option is only applied if IP auto configuration is set to none.
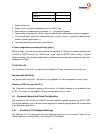
4.5 Keyboard, Mouse And Video Configuration
The freeView IP 100 can be connected to the host machine’s peripheral ports via PS/2 or USB.
The correct operation of the remote mouse depends on several settings which will be discussed
in the following subsections.
4.5.1 freeView IP 100 Keyboard Settings
The freeView IP 100’s settings for the host keyboard type have to be correct in order for the
remote keyboard to work properly. See Section 6.4.2 for details.
20