


GFK-1541B Appendix C PC Software Loader C-5
C
With your Ethernet Interface installed in a PLC, powered on and functioning, press the restart
button near the top of your Interface and hold it down for five seconds. When the button is
first pressed, all LED indicators will go out. After five seconds, the bottom LED will go on,
indicating that your Interface will enter the load state when the button is released. Release
the button. All LEDs will flash briefly and then begin to blink simultaneously. At this point,
your Interface is ready to accept a firmware load. (Note: If you hold the restart button down
too long, the Ethernet Interface will enter maintenance mode. To return to operational mode,
press and hold the restart button briefly (less than 5 seconds). Then re-execute the
instructions in this step.)
If all LEDs are not blinking after this step, but your Interface seems to operate normally
when first powered on, there may be a hardware failure of the Software Loader port. Use the
PLC programming software to check the PLC fault table for a "Module hardware fault"
message from the rack and slot location of your Interface. You can also check the text
displayed by the Ethernet Interface's local station manager NODE command for a "Power up
diagnostics result" message about the Software Loader port. See TCP/IP Ethernet
Communications for the Series 90 PLC Station Manager Manual, GFK-1186, for details.
The Firmware Update Utility will not function if there is a hardware failure of Ethernet
Interface Software Loader port. The Interface will be inoperative until it is power cycled. It
should be replaced.
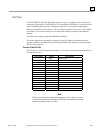
6. If the configuration data stored in your PLC for the Software Loader port of your Ethernet
Interface is identical to the default values (19,200 baud, ODD parity, 8 data bits, 1 stop bit, 0
modem turnaround time), skip the rest of this step.
The Firmware Update Utility will be unable to communicate with your Ethernet Interface
unless both use the same serial port settings. If your Ethernet Interface’s Software Loader
port configuration is different from the defaults for Ethernet Interface modules, you must set
the Firmware Update Utility to use the same serial configuration as your Interface each time
you run the Firmware Update Utility program. Press the F2 function key from the Firmware
Update Utility main menu to select the Loader Baud Rate menu. Use the Up/Down Cursor
and Tab keys to select serial port settings that are identical to the Logicmaster configuration
of your Interface. Then type Enter to accept the new settings.
WARNING: The Firmware Update Utility communicates using 8 data bits. This item is not
configurable from the Loader Baud Rate menu. The Firmware Update Utility will always
fail unless the Ethernet Interface’s Software Loader port is configured for 8 data bits.
7. From the Firmware Update Utility main menu, press the F1 function key to attach to the
Ethernet Interface. The message
<< Sending ATTACH - try # 1 >>
will appear. If all is well, this message will blink off briefly and then reappear. If the attach
fails, check the serial connection and the Ethernet Interface Software Loader port
configuration, and then carefully repeat steps 1 through 7.