


1-4
Installing the Management Module
Removing the Module
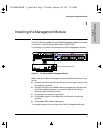
Installing the Management
Module
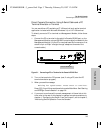
5. Turn on the power to the switch by plugging in the power cord. During
power-on, the following occurs:
If the module Fault LED stays on or flashes, refer to chapter 7, “Trouble-
shooting” in this guide.
You have now completed installation and verification of the module.
To configure IP/IPXcommunication for the Switch Management Module, see
chapter 4, “Configuring the Switch From the Console”.
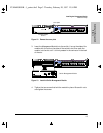
Removing the Module
The module is removed from the switch by reversing the installation steps
described earlier in this document. When handling the module, be sure to
follow the anti-static precautions described on page 1-2.
To remove the module, follow these steps:
1. Remove power from the switch by unplugging the power cord.
2. Unscrew the two captured screws holding the module in the switch.
3. Pull the module out of the slot.
4. Replace the Management Slot cover plate.
Caution Replace the cover plate over the slot using the two screws that hold it in place.
Be careful not to overtighten the screws. When using the switch, the cover
plate must always be installed. This is required for safety and to ensure proper
switch cooling.
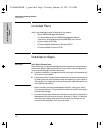
At Power On The switch begins its power-on self test followed by the module’s self
test. Ports are temporarily disabled until the Switch Management
Module configures the ports.
During Self Test All Switch and Module LEDs are on for approximately 5 seconds, then
just the switch Power and Fault LEDs and the Management Module
Self Test and Fault LEDs are on for the remainder of the self test. The
switch and module self tests require approximately 15 seconds total.
After Self Test The switch Fault LED and the module LEDs (Self Test and Fault) turn off.
YUMAMOD.BK : 1_yminst.fm5 Page 4 Thursday, February 20, 1997 12:54 PM