


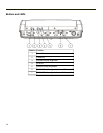


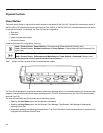


Data Entry
You can enter data into the Thor VX9 through several different methods. A tethered scanner connected to the COM1 serial port
or a Bluetooth scanner provides bar code data entry, the serial ports are used to input/output data, keyboards provide manual
entry and the touch screen also provides manual entry (simulating a desktop PC’s mouse).
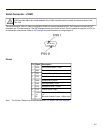
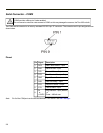
Keyboard Data Entry
Refer to Key Maps for 101-key keyboard equivalent keypresses.
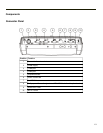
The keyboard is used to manually input data that is not collected otherwise. Almost any function that a full sized computer
keyboard can provide is duplicated on the VMT keyboard but it may take a few more keystrokes to accomplish a keyed task.
When using the 60-key keyboard almost every key has two or three different functions. The primary alpha or numeric character
is printed on the key.
For example, when the 2
nd
key is selected pressing the desired second-function key produces the 2
nd
character i.e. 2
nd
+ F1
toggles the CAPS Lock function. The specific 2
nd
character is printed above the corresponding key.
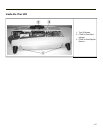
Bar Code Data Entry
The Thor VX9 supports an accessory bar code label reading device. Keyboard data entries can be mixed with bar code data
entries. Any scanner that decodes the bar code internally and outputs an RS-232 data stream may be used. COM port 1 is
designed to be used with a hand held tethered bar code scanner. Also, a Bluetooth bar code scanner can be used to enter bar
code data into the Thor VX9.
COM1 must be set to +5V on pin 9 when using a tethered serial scanner. See VMT Manager.
Touch Screen Entry
Note: The touch screen should be calibrated before initial use. See Touch Screen Calibration.
Note: Always use the point of the stylus for tapping or making strokes on the display. Never use an actual pen, pencil or
sharp object to write on the touch screen.
The touch screen input performs the same function as the mouse that is used to point to and click elements on a desk top
computer. A stylus is used in the same manner as a mouse – single-tap or double-tap to select menu options, drag the stylus
across text to select, hold the stylus down to activate slider bars, etcetera. Right-click is generated by tapping the mouse icon
in the system tray. After tapping, the mouse icon highlights the right button of the icon in red. The next touch screen tap is
treated as a right-click. The mouse icon then returns to the left button highlighted in red so subsequent taps are treated as left
clicks.
Hold the stylus as if it were a pen or pencil. Touch an element on the screen with the tip of the stylus then remove the stylus
from the screen. The touch screen responds to an actuation force (touch) of up to 4 oz. of pressure.
The touch screen can be used in conjunction with the keyboard and scanner.
l Touch the stylus to the field of the data entry form to receive the next data feed.
l The cursor begins to flash in the field.
l The unit is ready to accept data from either the keyboard, integrated scanner or a device connected to a serial port.
Note: The touch screen may be disabled. Please refer to Disabling the Touch Screen.
1-7