


Status Monitor
Installing the Status Monitor
Cautions:
v
The same status monitor can be used for printers connected via
USB and Ethernet.
v
Make sure that the status monitor is only installed once on a single
computer.
v
To continue using the status monitor after uninstalling the printer
driver, update the status monitor accordingly.
"Update of Status Monitor" (A page 76)
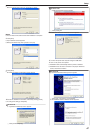
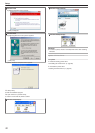
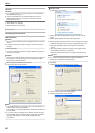
1
Start up Windows, and set the supplied CD-ROM into the computer
v
A card printer setup screen appears.
.
Memo:
v
If the CD-ROM drive of the computer is set to run automatically, the
installer will be executed automatically.
If the installer is not automatically initiated, double-click “SETUP.exe”
in the CD-ROM.
v
If you are not using the “SETUP.exe” automatic execution program
in the CD-ROM, start the installer for the status monitor by double-
clicking the following file in the CD-ROM: “English\Software
\STT_MON\install.exe”.
m
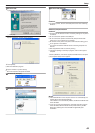
Windows Vista
v
A [AutoPlay] screen appears.
.
v
Clicking [Run SETUP.exe] displays the [User Account Control]
screen.
v
Clicking [Allow] displays the card printer setup screen.
2
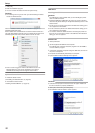
Select the [Status Monitor] checkbox on the card printer setup
screen
A Select the language to use from the [Language] pull-down menu
v
Selecting [Japanese] switches the program to the Japanese
version.
v
Selecting [English] switches the program to the English version.
B Select [USB connection] or [Ethernet connection] from [Interface]
C Select [Install] under [Action], and select the [Status Monitor]
checkbox
Memo:
v
You can select the [Printer Driver] and [Electronic Manual]
checkboxes to install them simultaneously.
v
Clicking [Open the Electronic Manual] opens the Electronic
Manual.
v
Clicking [Exit] ends the installation.
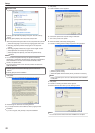
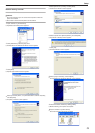
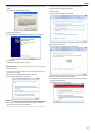
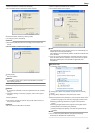
3
Click [Next]
v
A status monitor installation screen appears.
.
v
To change the displayed installation destination, click [Browse...] and
specify the destination folder.
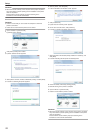
4
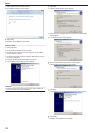
Click [Next]
v
A selection screen for registering the status monitor appears.
.
A Select the [Register for start menu] checkbox
v
To change the registration in the displayed Start menu, make a
selection from the [Register for start menu] list.
B Select the [Make a shortcut icon on desktop.] checkbox if
necessary
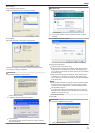
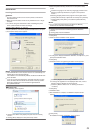
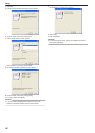
5
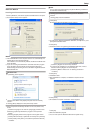
Click [Next]
v
Installation starts.
v
After installation is complete, an installation complete screen
appears.
.
6
Click [Finish]
v
An installation complete confirmation screen appears.
.
Setup
75