


NDA-24230 Issue 2.0 Page 3-1
VisuaLink 128/384 User Guide Chapter 3
Chapter 3 Initial Setting and Operation Checking
After completing the external phase, start the initial setting of VisuaLink.
3.1 Preparation
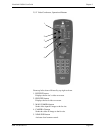
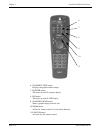
①
Put the attached two batteries in the attached remote controller.
➁
Turn the VisuaLink and all external equipment power in the
ON
position.
➂
Position the TV monitor and the VisuaLink system so that they can be viewed.
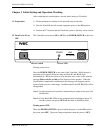
3.2 Turn Power ON or
OFF
The VisuaLink can be turned
ON
or
OFF
by the
POWER SWITCH
on the front.
Turning on the power:
Press the
POWER SWITCH
on the front of the VisuaLink. While the unit is
powering up, the green LED power lamp and Line B1 and B2-B6 light
simultaneously. While the system is in an initialize state, a blue screen with the
message
Please wait for a while
will be displayed on the monitor. When the
VisuaLink has completed its initialization, the message will disappear and be
replaced with a preview video image. In addition the B1 and B2-B6 LEDs will be
extinguished.
Note 1:
Unstable picture and sound may momentarily be output at the start of the
initialization.
Note 2:
If Line B1 B2-B6 LEDs do not extinguish after initialization (about 30
seconds), please turn power
OFF
and then back to the
ON
position.
Turning power OFF:
When the
POWER SWITCH
is pressed while the power is in the
ON
position,
the power turns
OFF
. The power lamp extinguishes when the power is
OFF
.
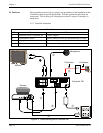
POWER HEADSET
POWER
LINE
B1 B2-B6
Power Switch
Power LED