


9-16
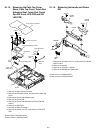
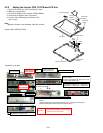
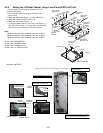
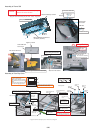
9.2.4. Setting the LCD Rear Cabinet, Hinge L and R and W-RDY ANT Unit
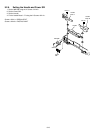
1. Fix the Hinge L and R using the 2 Screws <K9-1-4>.
2. Set the LCD Latch.
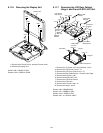
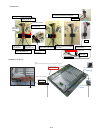
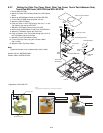
3. Fix the W-RDY ANT Unit using the 3 Screws <N2>
(No1 to No3).
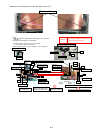
4. Attach the Rear Cable Sheet L / R and 2 Cable Tape.
5. Attach the LCD Corner Side Cover L / R.
6. Attach the LCD Corner Cover L / R.
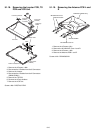
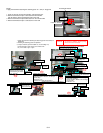
7. Fix the LCD Rear Cabinet, LCD Corner Side Cover L / R
and LCD Corner Cover L / R using the 12 Screws <N7>
(No1 to No 12) and 2 Screws <N13> (No1 to No2).
Note:
Tighten the Screws in the numbered order (No1 to No3).
Tighten the Screws in the numbered order (No1 to No12).
Tighten the Screws in the numbered order (No1 to No2).
Screws <N2>: DRHM5054XA
Screws <N7>: DRSB26+10HKL
Screws <N13>: DRSB4+10FKL
Screws <K9-1-4>: DRYN4+J10KLT
Assembly ANT ASS’Y
<N7>
<N7>
<N7>
<N7>
<N7>
<N7>
<N7>
<N7>
<N7>
<N7>
<N2>
No.1
<N2>
No.2
<N2>
No.3
<N13>
<N13>
<N7>
<N7>
LCD Latch
Antenna
Element
LCD Rear
Cabinet
LCD Corner
Cover L
LCD Corner
Side Cover L
LCD Corner
Side Cover R
LCD Corner
Cover R
LCD Front Cabinet
Hinge L
Hinge R
<K9-1-4>
<K9-1-4>
No.5
No.8
No.2
No.3
No.10
No.7
No.1
No.6
No.4
No.9
No.2
No.1
No.12
No.11
W-RDY
ANT Unit
Rear Cable
Sheet L
Rear Cable
Sheet R
Cable Tape
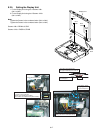
REAR CABLE SHEET L Attach.
Torque of Screw 㽳䇮㽴䇮=0.45㫧0.05N䊶m(㻍4.5㫧0.5kgf䊶cm)
Insert W-ANT CORNER COVER
without rattling or loosening.
Use the fixing jig.
Process the WHIP ANT Cable
to the upper part.
Process the ANT Cable along the groove.
Place it on the left of the black Cable.
W-ANT CORNER
COVER Attach
WATERPROOF
SHEET RAttach
ANT UNIT
W-RDY Attach
SCREW
-3Tighten
SCREW-2Tighten
SCREW-1Tighten
SCREW
-2Tighten
SCREW
-1Tighten
ANTENNA
ELEMENT
Tighten