


9-28
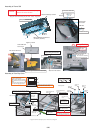
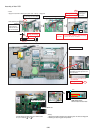
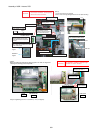
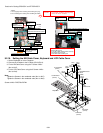
9.2.12. Setting the FPC HDD BAT
1. Fix the FPC HDD BAT using the Screw <N16>.
2. Connect the 2 Cables to the 2 Connectors (CN7,CN8).
3. Connect the Cable to the Connector (CN800).
4. Attach the PAD Protect Sheet.
5. Connect the Cable to the Connector (CN9).
6. Attach the Tape.
7. Connect the 2 Cables to the 2 Connectors (CN10,CN26).
8. Attach the Tape.
9. Attach the Antenna Cable Sheet on the Main PCB.
10. Fix the HDD FPC BAT using the 3 Screws <N29>
(No1 to No4).
Note:
Tighten the Screws in the numbered order (No1 to No4).
Screw <N16>: DRQT26+E5FKL
Screw <N29>: DRQT26+E3FNL
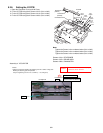
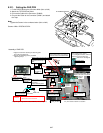
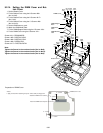
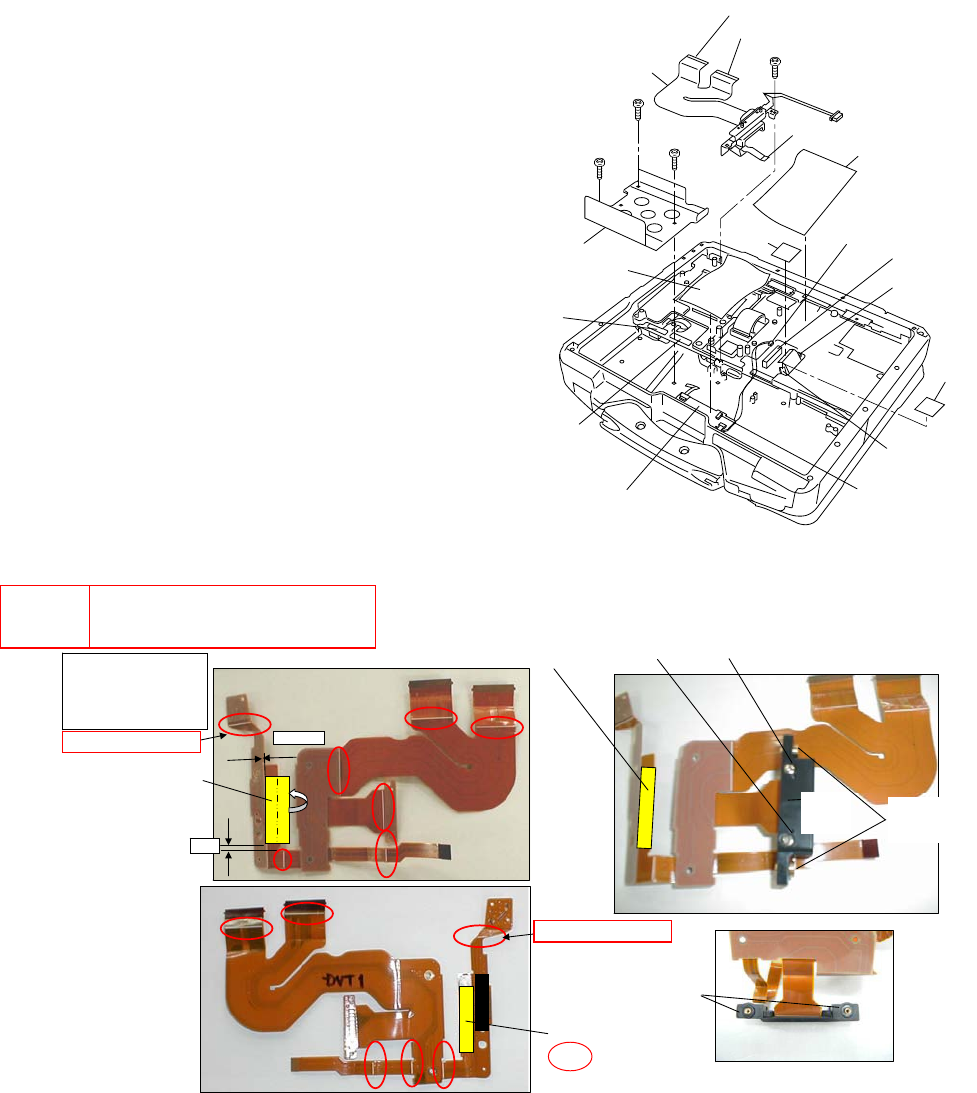
Preparation of HDD FPC ASS’Y
<N29>
<N16>
<N29>
Connector
(CN10)
Connector
(CN26)
HDD Cable Cover
FPC HDD BAT
Antenna Cable
Sheet
to Connector (CN800)
Connector
(CN800)
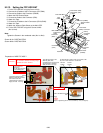
to Connector
(CN26)
Tape
Connector
(CN9)
Pad PCB
Tape
to Connector (CN8)
to Connector (CN7)
Connector
(CN8)
Pad Protect
Sheet
Connector
(CN7)
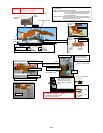
No.3
<N29>
No.2
No.1
0~0.5
1~3
Fold mountain based
on the white line.
R0.5 to R1
Do not apply the load
on the folding part.
Do not forget folding
Tape Attach based on the
stiffening plate side and fold
back to the back side.
(Avoid wrinkle or floating.)
Apply the load. 2 to 3 kg
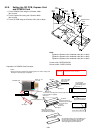
Tape Attach based on the
stiffening plate side
and fold back to the back side.
(Avoid wrinkle or floating.)
Apply the load. 2 to 3 kg
Fix with Screws in order of the rear number of No.
Ex.) Fix in order of Screw-1 to Screw-2.
Screw-2
Tighten
Screw-1
Tighten
BATT
Guide
Set
BATT
CN PIN
Set
Do not forget folding
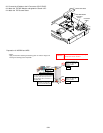
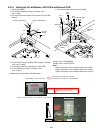
CAUTION
S1:Insulation S2:Bitten S3:Sharp Edge
S4:Part No. Check S5:Other
Torque of tightening Screw :0.19 ± 0.02N·m(Ṑ2.0 ± 0.2kgf·cm)
S3
Tape
Tape
BATT CN PIN Cushion
Set