


9-34
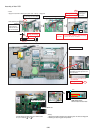
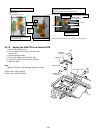
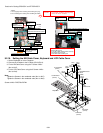
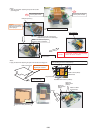
Cautions for Setting GPS ASSY and BT PCB ASS’Y
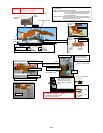
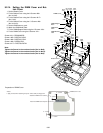
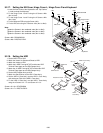
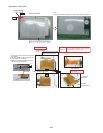
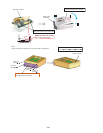
9.2.16. Setting the KB Cable Cover, Keyboard and LCD Cable Cover
1. Set the Keyboard on to the Computer.
2. Connect the 2 Cables to the 2 Cables (CN13,CN14).
3. Fix the KB Cable Cover using the 7 Screws <N29>
(No1 to No7).
4. Fix the LCD Cable Cover using the 3 Screws <N29>
(No1 to No3).
Note:
Tighten the Screws in the numbered order (No1 to No7).
Tighten the Screws in the numbered order (No1 to No3).
Screws <N29>: DRQT26+E3FNL
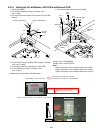
㪏㫧㪉
㪊㫧㪈
㪏㫧㪈
㪇䌾㪉
㪇䌾㪉
CAUTION
S1:Insulation S2:Bitten S3:Sharp Edge
S4:Part No. Check S5:Other
1. Do not gouge when inserting and removing the plug.
2. Do not damage the coating when handling the Cable.
<Notes>
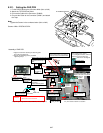
Pass the Cable
behind the
Cabinet protrusion
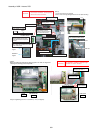
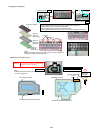
CABLE SHEET
Attach
TOP CASE SHEET
Attach
Tape
Attach
Tape
Attach
CABLE SHEET
Attach
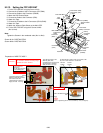
Cabinet Level Standard
Tolerance 0 to 1
Process the wire into the groove
Insert the
Cable plug
Match to the boss center. r2
Wire process: Fit to the plate squeeze line
Match to the level edge
of Cabinet
WHIP ANT CABLE
SUB ANT CABLE
MAIN ANT CABLE
Do not protrude
from this side
Cross-section view of cushion
Ensure the Cable
does not come over
the cushion.
<Note>
Each Cable must fit
in the slit of ANT Cable cushion securely.
The Cable must not cross
at the ANT Cable cushion part.
S2
S2
<N29>
<N29>
<N29>
<N29>
<N29>
<N29>
<N29>
<N29>
<N29>
<N29>
to Connector
(CN14)
Connector
(CN13)
Connector
(CN14)
to Connector
(CN13)
KB Cable Cover
LCD
Cable Cover
Keyboard
No.6
No.4
No.1
No.2
No.3
No.7
No.5
No.1
No.2
No.3