


3. Initial Startup and Configuration
3-6
February 2001 8784-A2-GB20-30
Procedure
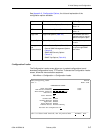
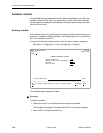
To upload or download a configuration:
1. Position the cursor in the Image File Name field. Type the name of the file to
be downloaded, or the name to be used for the file to be uploaded.
The file name may be a regular path name expression of directory names
separated by a forward slash (/) ending with the file name. The total path name
length can be up to 128 characters.
—
DOS machine:
If the TFTP server is hosted by a DOS machine, then
directory and filenames must consist of eight or less characters with an
optional suffix of up to three characters. The system will automatically
upload the configuration file and create directories and filenames as
needed.
—
UNIX machine:
If your server is hosted by a UNIX machine, the
configuration file you name
must already exist. It will not
be created on the
UNIX system by the TFTP server. It is critical
that you work with your
system administrator to plan the naming conventions for directories,
filenames, and permissions so that anyone using the system has read and
write permissions.
2. Position the cursor in the TFTP Server IP Address field. Enter the TFTP server
IP address.
The first three digits of the IP address cannot be 000 or greater than 223.
3. Position the cursor in the TFTP Transfer Direction field. Use the spacebar to
select Download from Server or Upload to Server.
4. Position the cursor in the Destination field. Use the spacebar to select a
network destination for the TFTP server. Select DSL if the TFTP server
destination is the DSL link port or IMC (in-band management channel) if the
TFTP destination is the Management port of the MCC.
5. Position the cursor at the Start Transfer field. Use the spacebar to select Yes.
Press Enter.
When the data transfer is complete, the Transfer Status field changes to
Completed successfully
.
6. Position the cursor at the
Activate new configuration?
prompt and
select Yes to activate a new downloaded configuration. Press Enter.
NOTE:
The following option settings are not changed:
— DSL Mode and Telnet Session configuration options
— Peer IP address
You must change these settings with the appropriate configuration menus
after the new configuration is activated. See Table A-1, Network Interface
Options, Table A-4, System Options, and Table A-5, Telnet Session
Options, in Appendix A,
Configuration Options
.