


C2904M-B (2/05) 35
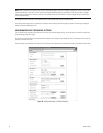
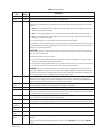
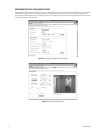
Table A. General Settings
Configuration Default
Description
Item Setting
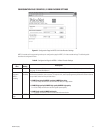
Unit Name None The Unit name and Unit ID identify the device; for example, in the event of an alarm call. (For future development.)
Unit ID None The ID serves as a machine-readable name. (For future development.)
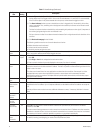
Password level None Select the password level from the pull-down menu.
Access to a NET4001A generally is protected with a password to prevent unauthorized use of the unit. The three
levels are:
• Service: This is the administrative, and highest level. This level grants access to all configuration parameters
after the current password is entered.
• User: This is the second highest level. This level lets the user view live video and access the control pages.
• Live: This is the lowest level. This level does not grant access to configuration pages but allows the unit to be
operated (for example, viewing video).
If any password level is set, you will be always be required to log on to the NET4001A.
For example, if a “live” level password is set and you view that unit through the browser, the unit will ask for a user
name and password to access any configuration page. If you then try to access the setup page, the unit will again
prompt for a user name and password.
IMPORTANT: “Service” is an administrative account. If you do not set up a “service” password, then there is no
point in setting up “user” or “live” passwords because a user can login to the unit as “service” and then eliminate
the “user” and “live” passwords.
Some scenarios that can occur are as follows:
• If a password is set for the service level, then the only way to access the setup page is by logging on using the
“service” user name and the “service” level password.
• If no password is set for the service level, then you can log on with the “service” user name and no password or
you can log on with the “live” user name and the “live” password you have selected.
WARNING: Setting a “user” level password on a transmitter can cause complications on the receiver side in a
box-to-box configuration. To avoid this, on the receiver’s Alarm Settings configuration page enter the transmitter’s
IP address and user password in the appropriate fields (live video IP address and remote receiver password). If no
“user” level password is set on a transmitter, then the receiver needs no setup.
Password None You can enter or change a password if the unit is accessed in the Service authorization level or if the unit is not
protected by a password. Passwords can be changed one at a time only (that is, either Service, User, or Live).
Maximum entry is 19 alphanumeric characters. All entered characters will be saved when you click Set; however,
only eight asterisks will be displayed when you access the screen next time.
Password None Re-enter the new password again to guard against typing errors. If the device
confirm is not protected by a password, the “No password set” message will be displayed.
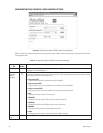
Date format Europe Use the pull-down menu to select the format for the date: USA, Europe, or Japan.
Unit date N/A Enter the current date in MM/DD/YYYY format for the USA; DD.MM.YYYY for Europe; and YYYY/MM/DD for
Japan. This is the system date, driven by the internal real-time clock. The day of the week (first entry box) need not
be entered and will be automatically adjusted based on the given date.
Unit time N/A Enter the current time or click the Synchr. PC button to synchronize the NET4001A with your computer’s system
time. The system time is driven by the internal real-time clock.
Time zone
(UTC + 1.00)
Use the pull-down menu to select the time zone for the NET4001A. This and the Timer Server IP Address settings
are important if the internal clock should be synchronized with the time received from a timer server on the Internet.
Time server 0.0.0.0 Enter the IP address of an NTP server. The time and date are automatically synchronized every two hours.
IP address
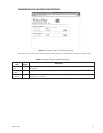
Hardware N/A Read-only hardware version number. This contains unique serial number, type of hardware, and revision.
version
Software N/A Read-only firmware version number. This is important information should you need technical support.
version
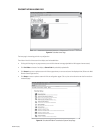
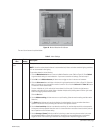
Software N/A Units have flash EPROMs for firmware upgrades in the field. These upgrades can be done directly from the web
upload browser.
Enter the name of the file containing the upgrade, or locate it using the Browse button. Then click the Upload
button.