


9-22 SV60890 Rev. G
9 • Maintaining and Updating
Changing the
Wiper Blade
Assembly
When you change the printhead, you must also replace the wiper blade
assembly.
Instructions for replacing the wiper blade assembly are included with each
replacement and are repeated here for your convenience.
1. From the IntelliLink® Control Center, press the Menu key.
2. Select Maintenance.
3. Select Replace Wiper Blade Assembly.
The “Preparing Wiper Blade” screen appears. During this time, the
system moves the printhead assembly back so that you can access
the wiper blade assembly.
4. The “Replace Wiper Blade Assembly” screen appears instructing you
to remove the wiper blade assembly from the package.
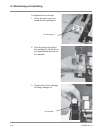
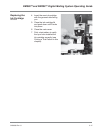
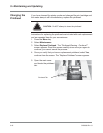
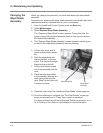
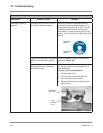
5. Lift the main cover and lo-
cate the wiper blade assem-
bly.
6. Push the wiper blade tab
toward the back of the ma-
chine. This causes the wiper
blade to slide to the left.
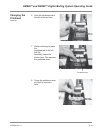
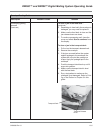
7. Lift the wiper blade up and
out of the assembly and dis-
card.
8. Place the new wiper blade
in the assembly with the two
white prongs facing to the
right. Slide it to the right until
it snaps into place.
Wiper Blade Tab
Wiper Blade
Assembly
9. Close the main cover; the “Initializing Wiper Blade” screen appears.
10. Once the initializing is complete, the “Print Test Pattern” screen ap-
pears and prompts you to “Press Tape or print an envelope”.
You must perform the print test at this time. Follow the prompts, or re-
fer to Printing a Test Pattern in this chapter for more information.