


17
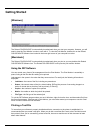
Setup Menu
A setup consists of a device and its associated properties. Items in the Setup menu apply to the selected
setup. Select a setup by clicking on the setup icon in the setup area of the main window.
Change Setup
The Change Setup command allows you to access and follow the same wizard-driven steps contained in the
original installation. Switch back to the original setup using the Change Setup command again.
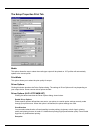
Setup Properties
Setup Properties displays the default print settings for your printer.
To View Setup Properties
From the Setup menu select
Setup Properties
The Setup Properties dialog opens with the General tab
selected (See Setup Properties section).
Density Adjustment (Hi-Fi JET/CAMM JET)
See Density Adjustment section.
Test Print
The Test Print command allows you to ensure that your software is properly installed and that the connection
to the printer is established.
To Print a Test
From the Setup Menu select
Test Print
. A small PostScript test file is sent to the Print Monitor and then
printed.
Test Cut (CAMM JET/ColorCAMM)
The Test Cut command allows you to ensure that your software is properly installed and that the connection to
the printer is established.
To Cut a Test
From the Setup Menu select
Test Cut
. A small Cut test file is sent to the Print Monitor and then sent.
View Menu
The View Menu allows the user to show or hide the Toolbar, view a RIP Log or Clear a RIP log.
To Show or Hide the Toolbar (only Windows)
From the View menu Select Toolbar to show the Toolbar select Toolbar again the hide the Toolbar.
View RIP Log
The View RIP log displays a text file containing a record of the RIP processes.
Clear RIP Log
The Clear RIP log purges information from the RIP log.