


32
Advanced Printing Procedures [Windows]
If your program is not listed, refer to a section on a similar program.
CorelDRAW 8
[Windows]
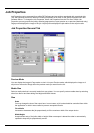
1. From the Roland COLORCHOICE Print Monitor click Setup>Setup Properties. Then click the Print tab.
2. Make sure the Perform Color Correction checkbox has a check in it.
3. In the ICC input profile area, select appropriate CMYK and RGB profiles. If you know which profiles your
application is using, select that profile. If you don’t, use the default setting.
4. For the ICC output profile, select the appropriate ink/media combination. Also select a rendering intent to
use. Click the Info button to see a full description of the selected profile.
5. Click
OK
in the Setup Properties dialog box.
6. In CorelDRAW, select Print Setup. Select your printer from the ‘Name’ field.
7. Click the Properties button. Choose a page size from the Paper field or select Custom Page for a custom
page size.
8. If you choose a Custom Page, click on the Custom button and enter the custom size in the paper width
and height fields. The paper size should match the size entered in Corel.
9. Click
OK
in the Printer Properties dialog.
10. Click
OK
in the Print Setup dialog.
11. Click File>Print. Then select your printer from the Name menu.
12. Select the PostScript tab and then select PostScript3 and uncheck Output Bitmaps in RGB.
13. Select the Miscellaneous tab and uncheck Use Color Profile.
14. Click
Print
.
CorelDRAW 7
[Windows]
1. From the Roland COLORCHOICE Print Monitor click Setup>Setup Properties. Then click the Print tab.
2. Make sure the Perform Color Correction checkbox has a check in it.
3. In the ICC input profile area, select appropriate CMYK and RGB profiles. If you know which profiles your
application is using, select that profile. If you don’t, use the default settings.
4. For the ICC output profile, select the appropriate ink/media combination. Also select a rendering intent to
use. Click the Info button to see a full description of the selected profile.
5. Click
OK
for Setup Properties.
6. In CorelDRAW select Print Setup. Select your printer from the Name field.
7. Click the Properties button, and then choose a page size from the Paper field or select Custom Page for
a custom page size.
8. If you choose a custom page size, you may enter the custom size by clicking the Custom button and
entering the width and height. The paper size should match the page size entered in Corel.
9. Click
OK
in the Printer Properties dialog.
10. Click
OK
in the Print Setup dialog.
11. Click File>Print. Then select your printer from the Name menu.
12. Set the options as shown and click
OK
to print.