


15 | CHAPTER 2 – INSTALLING YOUR SMART BOARD 600I3 OR SBD600I3
INTERACTIVE WHITEBOARD SYSTEM
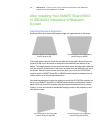
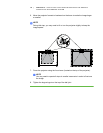
Performing an Image Alignment
Use this procedure to obtain a rectangular image that’s slightly smaller than your
interactive whiteboard’s screen.
NOTES
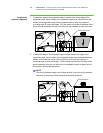
• Project a computer image (set to the proper resolution) while performing the
following steps. If you don’t have a computer, use the projector’s default blue
background so that you can see the fully projected image clearly.
• SMART doesn’t recommend adjusting digital keystoning within the projector.
Instead, use the mechanical adjustment described below.
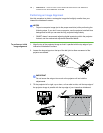
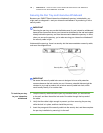
To perform an initial
image alignment
1. Align the top of the projected image so that it’s parallel with the top edge of your
interactive whiteboard’s surface.
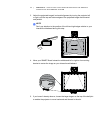
2. Loosen the large wingnut on the top of the ball joint to allow movement of the
projector as needed.
IMPORTANT
Do not loosen the wingnut too much or the projector will not hold the
adjustments.
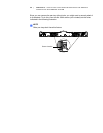
3. Tilt the projector left or right, up or down, or from side to side, until the top edge of
the projector image is parallel with the top edge of your interactive whiteboard.