


36 | GETTING STARTED WITH SMART NOTEBOOK SOFTWARE
Capturing Your Notes and Creating
Presentations with SMART Notebook
Create engaging and interactive lesson activities and presentations with colorful clip
art, Adobe® Flash® objects, graphics or text using SMART Notebook.
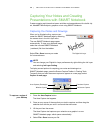
Capturing Your Notes and Drawings
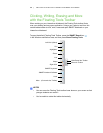
When you’re finished writing, capture your
notes to a SMART Notebook page by selecting
the camera icon in the Ink Layer menu.
The new SMART Notebook page opens
automatically. To view your captured image,
select the unsaved SMART Notebook
(.notebook) file from the taskbar.
Select File > Save to save your notes
for future reference.
NOTE
You can change your Digital Ink Layer preferences by right-clicking the Ink Layer
and selecting Ink Layer Setting.
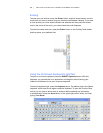
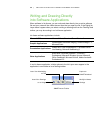
To display several options for capturing your notes and drawings to a
SMART Notebook page, press the Screen Capture Toolbar in Floating Tools.
To specify that you want the screen capture to appear on a new page, select
Capture to new page.
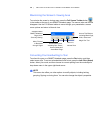
To capture a region of
your desktop
1. Press the Area Capture button.
The Area Capture tool appears.
2. Press on any corner of the area that you wish to capture, and then drag the
selection box with the pen until it surrounds the entire area.
3. Lift the pen from the screen.
The Area Capture tool captures your selection as a graphic in a new
SMART Notebook page, which opens automatically.
4. Select File > Save to save your file.
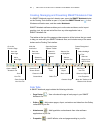
The Digital Ink Layer
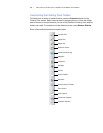
Freehand Capture
Full Screen Capture
Area Capture (Rectangle)
Window Capture