


47 | MAINTENANCE AND TROUBLESHOOTING
General Troubleshooting
Adjusting the Projected Image
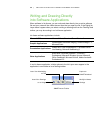
If your projector isn’t installed in a fixed location, you can correct many image
problems by shifting your projector so that the projected image fits squarely on your
interactive whiteboard’s screen. Optimally, each side of the image should extend
almost to the edge of your interactive whiteboard’s display surface. You can then
adjust the zoom lens to display a focused image.
NOTES
• Don’t adjust the image size and geometry based upon your projector’s splash
screen. The splash screen image is much smaller than the computer’s
projected image. Before you adjust the projected image, make sure that you
set the computer’s resolution and refresh rate (see page 24).
• Complete the following procedures only as required.
• If you’re unable to adjust the projected image to fill the entire writing surface
and you’re experiencing difficulty orienting your interactive whiteboard, see
The orientation procedure stops at the first point and won’t proceed to the
next point on page 52.
To adjust the
projected image
1. If the left and right edges of the projected image aren’t parallel, raise or lower your
projector at the front or back until the edges are parallel.
2. If the top and bottom edges aren’t parallel, turn the projector slowly until the edges
are parallel.
3. Further adjust your projector using small, slow movements until you’re satisfied
with the projected image.
– Correct the image’s horizontal and vertical position by adjusting the height
and position of the projector platform or stand.
– Adjust the image laterally by sliding the projector to the left or right.
– Adjust the image size by moving the projector forward or backward
to increase or reduce the image size until it correctly fills the screen.
4. Make fine adjustments to the image level and size according to your projector
manufacturer’s instructions.
NOTE
The method for changing the projected image depends on your projector.
For more information, see the instructions included with your projector.
5. Create a clear image by adjusting your projector’s focus function.