


37 | GETTING STARTED WITH SMART NOTEBOOK SOFTWARE
Creating, Managing and Presenting SMART Notebook Files
If a SMART Notebook page isn’t already open, press the SMART Notebook button
on the Floating Tools toolbar to open it, or press the SMART Board icon in the
Windows notification area, and then select Notebook.
SMART Notebook software enables you to write notes and draw, and to import
graphics, text, clip art and entire files from any other application into a
SMART Notebook file.
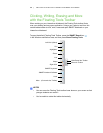
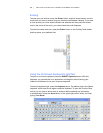
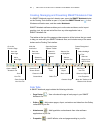
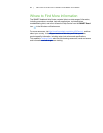
The toolbar at the top of the page provides access to all the buttons that you need
to help you work with your SMART Notebook files, and includes many of the same
buttons as the Floating Tools toolbar.
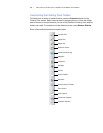
Side Tabs
A SMART Notebook page includes the following side tabs:
• Page Sorter – View a thumbnail image of each page in your SMART
Notebook file.
• Gallery – Add custom pages, clip art, animations and video from the Gallery
collections to your file.
• Attachments – Add hyperlinks or attachments from other software
applications to your file.
• Properties – Add fill effects, color and page recording to your file.
Go to the
Previous Page
Go to the
Next Page
Add a
New Page
Undo the
Last Action
Redo the
Last Action
Delete the
Selected Object
Open the
Document
Camera
Open a
Table
Erase an
Object
Select a Pen
or Highlighter
Select a
Creative Pen
Draw a Recognized
Shape
Select the Magic
Pen Tool
Select an
Object’s Line
and Fill Color
Open a SMART
Notebook File
Save
Your File
Paste Content
Into Your File
Show/Hide the
Screen Shade
Present in Full
Screen Mode
Open the Screen
Capture Toolbar
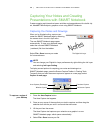
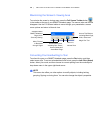
Select Tool
Draw a Line
Create a Shape
Add Text to
Your File
Select an Object’s
Line Properties
Move the Toolbar to the
Bottom of the Screen