


52 | MAINTENANCE AND TROUBLESHOOTING
The orientation
procedure stops
at the first point
and won’t proceed
to the next point.
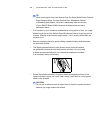
The projected image
doesn’t completely fill
the writing surface
of your interactive
whiteboard.
SMART product drivers
orientation software is
optimized for the field
of view of each camera
when the projected
image fills the entire
writing surface. If your
projected image is too
small, the field of view
of the cameras won’t
include the first
orientation point.
Therefore, the software
won’t detect your touch
point, and the
orientation
procedure stalls.
Move your projector away from
your interactive whiteboard or
adjust the projector’s zoom feature
so that the projected image fills the
entire writing surface, and then
repeat the orientation procedure.
OR
If you can’t adjust the projected
image to fill the entire writing
surface of your interactive
whiteboard, perform the following
steps:
1. In the Windows notification
area, select the SMART Board
icon , and then select
Control Panel.
The SMART Notebook control
panel opens.
2. Select SMART Hardware
Settings.
3. From the drop-down menu,
select Orientation/Alignment
Settings.
4. Clear the Projected image
fills the entire display area
option.
5. Click Apply.
6. Click Orient/Align the SMART
Product.
The orientation screen
appears.
7. Perform the orientation
procedure.
Symptoms Cause Solution