


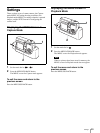


Operations (Shooting and Printing)
28
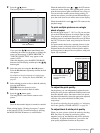
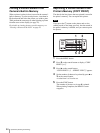
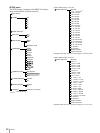
To protect all pictures
1
Set the mode dial to .
2
Press the MENU/GO BACK button.
The MENU screen appears.
3
Select PROTECT by pressing the v or V control
button.
4
Press the ENTER button.
The PROTECT screen appears.
5
Select ALL ON by pressing the v or V control
button.
6
Press the ENTER button.
The mark appears and all pictures are protected.
To return to the MENU screen
Select CANCEL on the PROTECT screen, and then
press the ENTER button.
To exit protection settings
Press the MENU/GO BACK button.
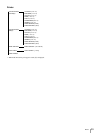
To release picture protection
If you wish to delete a protected picture, you must first
release its protection setting.
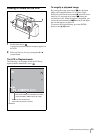
To release individual protected pictures
1
Display the PROTECT screen, and press the b or B
control button to select a picture to release.
2
Select THIS IMAGE OFF by pressing the v or V
control button, and then press the ENTER button.
To release all protected pictures
Display the PROTECT screen, select ALL OFF by
pressing the v or V control button, and then press the
ENTER button.
The protection is released.
The mark at the top right of the LCD disappears, and
the THIS IMAGE ON button appears.
For details on displaying the PROTECT screen, see “To
protect individual pictures” on page 27 and “To protect
all pictures” on page 28.
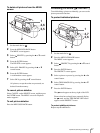
Turning Off the Power
To set the printer to standby mode
Press the 1 button. The standby lamp goes out, and the
printer is set to standby mode.
To turn off the camera
Turn off the camera by pressing the 1 button.
The camera stores the latest settings data in memory and
automatically shuts down completely.
Note
If you cut off the power supply by disconnecting the AC
power adaptor or removing the batteries while the
camera transfers settings data to memory, any new
settings may be lost, and the camera may revert to its
previous settings.