


I
‘.
2 Press the CG&SC button, so that the fanfold paper is moved out of the
paper path.
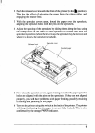
3 Now move the release lever to the rear of the printer ( c position) to select
cut-sheet paper (disengaging the fanfold sprockets).
NOTE
If you do not move the release lever at this stage, the printer will warn you
at the next step by emitting a continuous series of beeps.
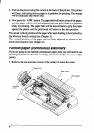
4 Insert the cut sheet paper in the paper guides
5 Press the C~S!SF button in order to feed the cut sheet to the starting print
position. The printer will automatically go on-line.
6 Print as normal on the cut sheet(s), and when you have finished printing,
put the printer off-line (by pressing the [ w u&I: button again).
7 If the sofiwarc has not done this for you, eject the paper by pressing the
‘:w?$%:‘ button.
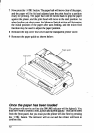
8 Move the release lever to the front of the paper (m position) to select
fanfold paper (engaging the fanfold sprockets).
9 Now feed the fanfold paper to the print position by pressing the ~C%ZZF
button. The paper will move to its former print position, and the printer
will automatically go on-line.
You are now ready to start printing on fanfold paper again.
Short tear-off function
The short-tear-off function is handy when using fanfold paper. It ejects the
paper so that the perforation is just above the transparent cover, allowing you
tear it off without having to open up the printer. It then reverses the paper
feed after you have tom off the paper, thereby starting printing at the top of
the next form. This feature is especially useful if you are using pre-printed
stationery (such as invoices, etc), which will not be printed all together.
To use the short tear-off function, press the %A&! button when the printer
is on-line, and hold it down for a few seconds. When you release the button,
the printer will go off-line, and the paper will move up a few inches, allowing
you to tear off the form.
15