


GL-1010 Network Fax Operator’s Guide 59
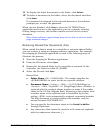
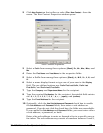
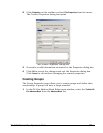
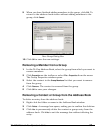
2 Click New Contact on the toolbar or select File > New Contact... from the
menu. The New Contact Properties window opens.
New Contact Properties
3 Select a Prefix from among these options: [Blank], Dr., Mr., Mrs., Miss, and
Ms.
4 Enter the First Name and Last Name in the respective fields.
5 Select a Suffix from among these options: [Blank], Jr., M.D., Sr., II, III, and
IV.
6 Select a name display format or type one of your own in the Display
field. The pre-defined options are:
Prefix First Last-Suffix, Prefix Last
First-Suffix
, and Prefix Last, First-Suffix.
7 Type the
Company and Department Name for the recipient.
8 Type the required
Fax Number for the recipient. Acceptable field entries
are: 0, 1, 2, 3, 4, 5, 6, 7, 8, 9, *, #, +, -, (space), and (comma).
9 Type the
E-mail Address for the recipient.
10 Optionally, click the
Use Sub Address and Password check box to enable
the
Sub Address and Password fields, then enter a sub address or
password. If you do not click the check box, the fields are unavailable.
If you enable the Sub Address and Password fields, you must enter either
a sub address, a password, or both.
Enter a fax sub address to route or forward a fax to a specific user or
fax inbox. The sub address may consist of numbers between 0 and 9,