


7 Scanning
7-2 Xerox Phaser 3200MFP
Scanning Basics
NOTE: To scan with your machine, you must install the software.
For details,
see the installing printer software in windows section of Chapter 6, Printing to
install the scan software.
Your Phaser 3200MFP offers the following ways to scan an image:
• From the control panel on your machine to an application:
Use the
Scan
button on the control panel to initiate scanning. Assign the
TWAIN-compliant software, such as Adobe Photo Deluxe or Adobe
Photoshop, to the machine by selecting it from a list of available
applications via the
Scan
button. To compose the list of available
applications, you must configure it in the scan settings tab of the
ControlCentre program. For details, see Using ControlCentre on page 2-22.
• From TWAIN-compliant software:
You can use other software including Adobe PhotoDeluxe and Adobe
Photoshop. For details, see Scanning Process with TWAIN-enabled
Software on page 7-3.
• From the Windows Images Acquisition (WIA) driver:
Your machine also supports the WIA driver for scanning images. For
details, see Scanning Using the WIA Driver on page 7-4.
Also, you can send scanned images to several destinations using a network
connection:
• To your networked computer via the Network Scan program. You can
scan an image from the machine, if network-connected, to the computer
where the
Network Scan
program is running.
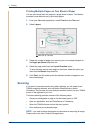
Scanning From the Control Panel to an Application
1. Make sure that your machine and computer are turned on and properly
connected to each other.
2. Load the document(s) face up into the ADF, or place a single document
face down on the document glass.
For details about loading a document, see Loading Paper on page 2-6.
3. Press Scan. “Application” appears on the bottom line of the display.
4. Press Enter.
5. Press the scroll button ( or ) to select an application to receive the
scanned image.
6. Press Start to start scanning. The selected application window opens
with the scanned image.