


7Scanning
Xerox Phaser 3200MFP 7-7
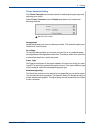
5. Enter the IP address in dotted decimal notation or as a host name.
6. Enter the server port number, from 1 to 65535.
The default port number is 25.
7. Put a check mark in SMTP Requires Authentication to require
authentication.
8. Enter the SMTP server login name and password.
9. Click Save Changes.
Scanning to a network client
Network Scan allows you to remotely scan an original from your network-
connected machine to your computer in JPEG, TIFF, or PDF file format.
Scanning
1. Make sure that your machine and the computer are connected to a
network and Network Scan is running on the computer.
NOTE: For black/white scanning only TIFF and PDF are available. For color,
only JPEG is available.
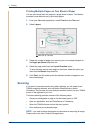
2. Load originals face up into the ADF, or place a single original face down
on the scanner glass.
3. Press Scan.
4. Press the scroll button ( or ) until “Network” appears on the bottom line
of the display and press Enter.
5. Select the scroll button ( or ) until the User ID you have set in the
Xerox Network Scan Manager window and press Enter.
6. Enter the PIN you have set in the Xerox Network Scan Manager
window and press Enter.
7. press Enter to start scanning. Your machine begins scanning the original
to the computer where the program is running.
Setting network scan timeout
If the Network Scan program on your computer does not send a refresh
request and does not scan a job within a specified timeout period, your
machine cancels the scan job. You can change this timeout setting as needed.
1. Press Menu until “Machine Setup” appears on top line of the display.
2. Press the scroll button ( or )
until “Scan Timeout” appears on the
bottom line. Press Enter.