


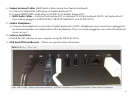

4. Computer Setup – see instructions with computer (NOTE: You don’t need to install MIE software yet)
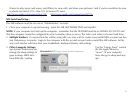
5. Teacher Area Setup
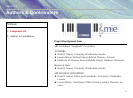
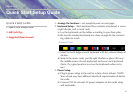
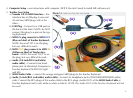
a) Yamaha UX-16 MIDI Interface – this
interface has a USB plug at one end
(b) and two MIDI plugs (c/d) at the
other...
b) USB Plug – Connect to a USB port on
the back of the iMac (NOTE: do NOT
connect this plug to a port on the typ-
ing keyboard)
c) MIDI IN plug connects to MIDI OUT
(Blue on label) of Teacher Keyboard -
NOTE: the word ‘IN’ is on the plug,
but very difficult to read...
d) MIDI OUT plug connects to MIDI IN
(Yellow on label) of Teacher Key-
board - NOTE: the word ‘OUT’ is on
the plug, but very difficult to read...
e) Audio [1/8 inch/RCA (red/white)
audio cable] – Connect from head-
phone jack of Macintosh Computer to
Teacher Keyboard AUDIO IN (right
and left).
f) MIDI/Audio Cable – connect the orange and green MIDI plugs to the Teacher Keyboard
g) Audio [¼ inch/RCA (red/white) audio cable] – Connect to headphone jack of TEACHER KEYBOARD (either
side). Connect the RCA plugs of this audio cable to the RCA plugs (Audio OUT) of the MIDI/Audio Cable at
Teacher Keyboard (red to red, white to white or black). NOTE: The Audio OUT of the Teacher Keyboard will not
be used.
11
Photo 1.1 Cables for Teacher Area Setup
(a)
(b)
(c/d)
(e)
(f)
(g)